
If you have ever searched for “how to add custom fields to WooCommerce checkout,” you have probably found a wall of PHP code snippets. Tutorials telling you to open your theme’s functions.php file, paste a block of code, save, and hope for the best. For many WordPress users, especially non-technical store owners, this approach feels risky. And honestly, it is. One misplaced bracket in functions.php can take down your entire website.
The good news is that adding custom fields to your WooCommerce checkout does not require writing code. Not a single line. Visual checkout field editor plugins let you create any type of custom field through a point-and-click interface, place it exactly where you want it on the checkout form, set it as required or optional, and configure validation rules. The field data automatically flows into your order emails and admin order pages without any extra setup.
This guide walks through the entire process step by step. We will cover every field type you can add, where to place custom fields on the checkout page, how to configure validation, and how the data you collect shows up in your orders. We are using the NEXU WooCommerce checkout field editor for adding custom fields without coding for all examples.
Why the code approach is not worth it for most store owners
Before we get into the no-code method, let us be clear about why the code method is problematic for most people. The standard PHP approach to adding a custom field to WooCommerce checkout involves four separate code functions that must work together correctly.
First, you write a function using the woocommerce_after_checkout_billing_form hook to display the field on the frontend. Second, you write a validation function using woocommerce_checkout_process to check whether the field was filled in correctly. Third, you write a save function using woocommerce_checkout_update_order_meta to store the field data in the order. Fourth, you write a display function using woocommerce_admin_order_data_after_billing_address to show the data in the admin. That is four hooks, four functions, and four places where something can break.
Even if you get it working, a theme update can overwrite your functions.php changes. A WooCommerce update can change the hooks your code relies on. Adding a second or third custom field means duplicating all four functions with modified names. Changing the field label or moving it to a different position requires editing the code. There is no visual feedback until you save and reload the page.
A visual checkout field editor replaces all four of those PHP functions with a single interface. You create the field, configure its properties, place it where you want it, and save. The plugin handles the rendering, validation, saving, and display automatically. Your customizations are stored in the database, not in theme files, so they survive theme and WooCommerce updates without any risk.
Every field type you can add to WooCommerce checkout
A good checkout field editor gives you multiple field types to choose from so you can collect exactly the right kind of data for your business. Here is every field type available and when each one is most useful.
A single-line text field for short responses. Use it for purchase order numbers, engraving text, license plate numbers, membership IDs, referral codes, or any short piece of information. Set the placeholder text to show the expected format (“e.g., PO-2026-0421”) so customers know exactly what to enter.
A multi-line text area for longer responses. Ideal for gift messages, special delivery instructions, custom order notes, dietary requirements for catering orders, or any situation where the customer needs space to write more than a few words. Set it to optional unless the information is truly essential for fulfillment.
A dropdown menu where the customer picks one option from a predefined list. Use it for delivery time preferences (“Morning / Afternoon / Evening”), gift wrapping styles (“Standard / Premium / None”), or any question with a limited set of valid answers. Dropdowns ensure clean, consistent data that does not require interpretation.
Similar to dropdowns but all options are visible at once. Better for choices with 2 to 4 options where you want the customer to see all alternatives without clicking. Use for “Personal / Business” address type, “Standard / Express” delivery, or “Self / Gift” order type. Visibility of all options can reduce decision time.
A yes/no toggle. Perfect for opt-ins and confirmations: “Subscribe to our newsletter,” “I confirm I am 18 or older,” “This is a gift,” “Add gift wrapping,” “I agree to the terms of service.” Checkboxes are also excellent as conditional logic triggers that reveal additional fields when checked.
An interactive calendar widget that lets customers select a date. Essential for delivery date selection, appointment booking, event registration, subscription start dates, or any time-sensitive service. The date picker eliminates format confusion (“03/04” could mean March 4th or April 3rd) and always returns a valid, consistent date.
Lets customers attach files at checkout. This field type is invaluable for B2B stores collecting tax exemption certificates or business licenses, print shops receiving custom artwork files, custom product stores accepting reference images, and healthcare stores collecting prescription documents. The file is uploaded and attached to the order record.
Where to place custom fields on the checkout page
WooCommerce divides the checkout page into three main sections: billing fields, shipping fields, and additional fields (also called order notes). When you add a custom field, you need to decide which section it belongs in. The placement affects both the visual flow for the customer and the logical grouping of data.
Use this section for fields related to who the customer is and their account information. VAT numbers, tax IDs, company registration numbers, loyalty card numbers, and account reference codes all belong here. If you are renaming or reordering existing billing fields (like moving the email to the top), those changes also happen in this section.
Use this section for fields related to delivery logistics. Gate codes, buzzer numbers, floor access details, delivery time preferences, and drop-off instructions belong here because they are directly relevant to the physical delivery of the order. These fields make the most sense when positioned alongside the shipping address.
Use this section for fields related to the order itself rather than billing or shipping. Gift messages, special instructions, personalization details, referral source (“How did you hear about us?”), and newsletter opt-in checkboxes work well here. This section appears below the billing and shipping sections and is the most flexible area for custom data collection.
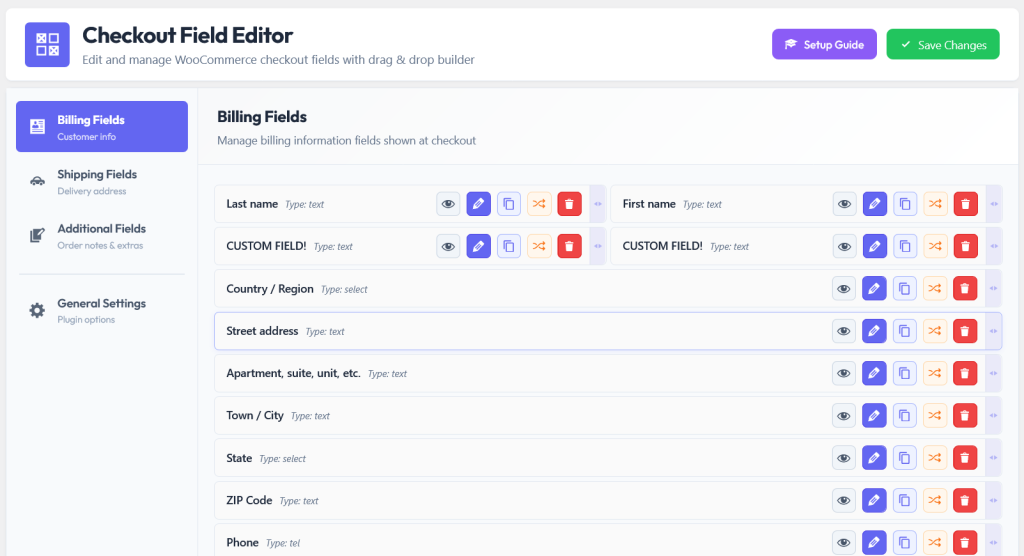
Step-by-step: adding your first custom field
Let us walk through adding a practical custom field from start to finish. We will add a “Preferred Delivery Date” date picker field to the additional fields section. This is one of the most commonly requested custom fields for WooCommerce stores.
In your WordPress admin, go to the checkout field editor settings page. You will see tabs or sections for Billing, Shipping, and Additional Fields. Click on the Additional Fields tab since that is where we want to place our delivery date field.
Click the button to add a new field. Select “Date Picker” from the field type options. This will create a field that displays an interactive calendar widget on the checkout page. The customer clicks the field and selects a date from a visual calendar rather than typing a date manually.
Set the field label to “Preferred Delivery Date.” Add placeholder text like “Select your preferred date.” Decide whether the field is required (if your store needs a delivery date for every order) or optional (if it is a nice-to-have preference). For most stores, making this optional is the better choice since it does not block customers who do not have a preference.
Save your configuration. Open the checkout page in a new browser tab or incognito window. You should see the new date picker field in the additional fields section. Click on it and verify the calendar opens. Select a date, place a test order, and check that the selected date appears in the order confirmation email and in the admin order details.

That is the entire process. Four steps, no code, no theme files, no risk of breaking your site. The field is active on your checkout page, the data is captured with every order, and it shows up wherever you need it: in emails, in the admin, and in order exports.
Making custom fields smarter with validation
Adding a custom field is only useful if the data customers enter is actually usable. Validation rules ensure that customers provide properly formatted information before they can submit the order. Without validation, a phone number field might receive “hello” as input, a postal code field might receive an email address, and your fulfillment team is left trying to interpret data that makes no sense.
Most visual checkout field editors let you set validation rules without writing custom regular expressions. Common validation options include making a field required (the order cannot be placed if the field is empty), validating email format (checks for the @ symbol and a valid domain structure), validating phone number format, and setting minimum or maximum character lengths.
Good placeholder text is the first line of validation. If your text field should contain a purchase order number, a placeholder like “e.g., PO-2026-0421” tells the customer exactly what format you expect. Most customers will follow the format shown in the placeholder, reducing the need for strict validation rules that might frustrate edge cases.
Where custom field data appears after the order is placed
One of the most common concerns about adding custom checkout fields is whether the data will actually show up where it needs to. With a properly built checkout field editor, custom field data flows automatically into three places.
Both the customer-facing confirmation email and the admin notification email include the custom field data. If a customer filled in a gift message, it appears in the email. If they uploaded a file, the file reference is included. This ensures the customer can verify what they submitted and your team can see it without logging into the admin.
When you open an order in WooCommerce admin, the custom field data is displayed alongside the standard billing and shipping information. Your team can see the delivery date the customer chose, the engraving text they requested, or the PO number they provided without searching for this information in emails or external systems.
The customer can see their custom field data when they view the order in their account. This is important for transparency and reduces support inquiries. If a customer wants to verify the delivery date they selected or the engraving text they submitted, they can check it themselves without contacting your support team.
Going further: per-product fields for specialized products
The fields we have covered so far are global fields: they appear on the checkout page for every order. But what if you need a custom field that only applies to a specific product? An engraving text field that only shows up when an engravable ring is in the cart. An attendee name field that only appears when event tickets are being purchased.
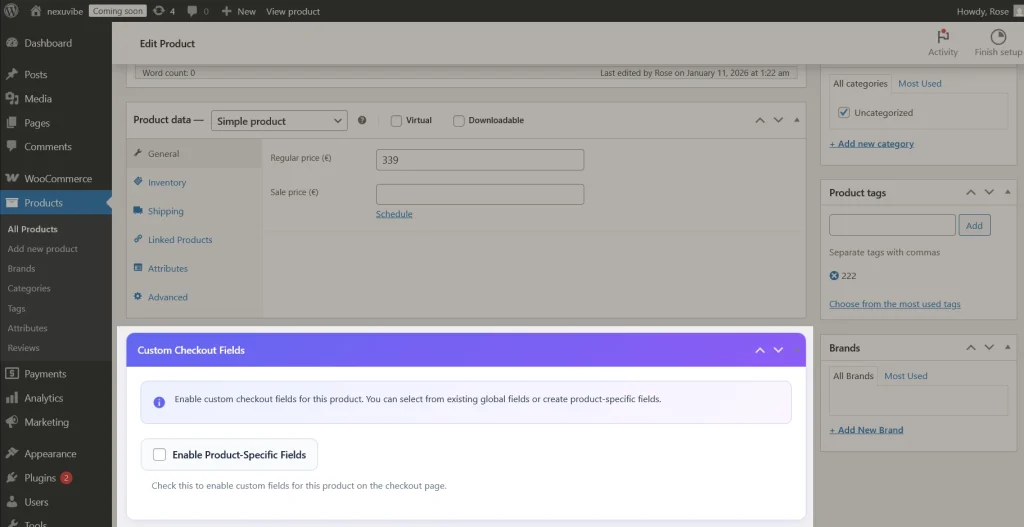
Per-product fields are created from the product edit screen, right alongside pricing and inventory settings. You define the field, and it only appears at checkout when that specific product is in the cart. This keeps your global checkout clean while still collecting product-specific data when it matters. No code, no conditional logic workarounds, just a direct assignment from the product to its checkout fields.
This feature is particularly valuable for stores that sell a mix of standard and customizable products. The customer buying a plain t-shirt sees a simple checkout. The customer buying a custom embroidered jacket sees the embroidery text and color preference fields. Both customers get a checkout experience that matches their purchase.
Common custom field recipes for different stores
To help you get started quickly, here are ready-to-use field configurations for common WooCommerce store types. Each one can be implemented in minutes without writing code.
Adding custom fields to WooCommerce checkout does not need to be a technical project. You do not need a developer, you do not need to touch PHP code, and you do not need to risk breaking your site by editing theme files. A visual checkout field editor makes the process fast, safe, and reversible.
Whether you need a simple text field for purchase order numbers or a complex setup with date pickers, file uploads, and conditional logic, the tools exist to build exactly the checkout form your business requires. The NEXU WooCommerce checkout field editor with custom fields, per-product support, and drag-and-drop interface handles all of these field types and configurations through a single, code-free interface.
Add any custom field to your WooCommerce checkout in minutes
Text, textarea, dropdowns, radio buttons, checkboxes, date pickers, file uploads. Every field type, zero code, and your custom data flows automatically into order emails and admin pages.






Hey quick question: if I customize fields, will
Picked this up for my buddy who runs a little shop of his own. he's always been nervous about touching code but really needed those extra fields for purchase order numbers and custom engraving text. This guide made it so easy no scary functions.php meltdowns this time. The best part? The data just pops right into his order emails now, no extra work needed. Still, totally worth it in the end!
Hey everyone! a coworker shared this guide for adding custom checkout fields without coding, and it looks perfect for our EMS supply store. The part about not having to mess with functions.php is a huge plus I've had a single typo take down our site in the middle of a shift before, and that's not fun