
The affiliate registration page is the entry point of your program. It is where prospective affiliates land when they decide they want to join, and the experience they have on that page — what information they see, what fields they fill in, how smoothly the form works — shapes both who applies and how many qualified applicants actually complete the process. A well-built registration page functions as a quality filter and a first impression simultaneously.
Most WooCommerce affiliate programs give registration almost no thought. They put a default form on a generic page with a title like “Become an Affiliate” and wonder why they get mostly low-quality applicants or why the application completion rate is poor. The registration page deserves the same design and copy attention as any other conversion page on your store — because that is exactly what it is.
This guide walks through creating an affiliate registration page in WooCommerce from scratch using Affiliate Engine, a WooCommerce affiliate program and registration management plugin — including the registration form embedding options, custom field configuration, the approval mode settings that control what happens after someone applies, and the copy framework that converts page visitors into applicants.
What the registration page needs to do before the form appears
Most affiliate registration pages show a form immediately and put any program description either above it in small print or not at all. This is backwards. The form converts applicants who are already convinced. The page copy is what does the convincing. Before someone fills in a single field, they need answers to three questions: what do I earn, how does it work, and is this worth my time?
Your page headline should include your commission rate. “Earn 15% on every sale you refer” tells visitors immediately whether the program is worth their time. “Become an affiliate” tells them nothing. The commission rate is the single most important piece of information on the page, and putting it in the headline rather than burying it in the body text significantly increases the proportion of visitors who continue to read. If your commission rate varies by product or tier, state the entry-level rate with a note that higher rates are available.
Three or four sentences explaining how the program works: you get a unique link, you share it, when someone buys through it you earn a commission, payouts happen on a schedule via PayPal or bank transfer. This does not need to be comprehensive — detailed terms belong in a separate program terms document, not on the registration page. The purpose here is to confirm that the program works in a way the applicant is familiar with, not to explain every edge case.
Before the form, include three or four short bullets or icons covering the most appealing aspects of your program: the commission rate, the payout schedule, the cookie duration, and whether you provide promotional materials. These give the skimming visitor the same information the reader gets from the body text. Most people skim before they decide to read — give them something worth skimming.
H1: “Earn 15% commission on every sale you refer to [Store Name]”
Subheading: “Share your unique link, earn when your friends or followers buy — paid monthly.”
Three highlights: 15% commission on all products | Monthly payouts via PayPal | 60-day tracking cookie
Brief description: Two to three sentences on how the program works and who it is for.
Form: Embedded below the description.
Step 1: Configure the registration settings in Affiliate Engine
Before creating the page, configure the registration settings in the plugin. These settings determine the form behavior, approval mode, and the fields that appear on the form. The Registration tab in the plugin settings is where all of this lives.

The first and most important setting to configure is the approval mode. There are two options: auto-approval (anyone who submits the form is immediately approved and gets access to their affiliate dashboard) and manual approval (submissions go into a pending queue that you review before approving). This decision affects everything downstream — the quality of your affiliate list, the support burden you carry, and the nature of your program.
Anyone who submits the form gets immediate access. No waiting period, no review step. Affiliates can start sharing their link within minutes of applying.
Submissions go to a Requests queue. You review each application and approve or decline. Affiliates only get access once you approve them.
Step 2: Configure custom registration fields
The fields on your registration form serve two purposes: they collect the information you need to make an approval decision, and they filter out low-effort applicants who are not serious enough to spend two minutes filling in a form. Both purposes are valuable, and the field configuration is where you calibrate the balance between them.
The rule for custom fields is to collect exactly what you need to approve the applicant — no more, no less. Every additional field adds friction and reduces form completion rates. A form that asks for name, email, website or social media URL, and a one-sentence description of their audience will give you everything you need to make a good approval decision. A form that also asks for phone number, date of birth, mailing address, and promotional strategy has too much friction and will be abandoned by people who are genuinely interested.
A website URL or social media profile link is the single most useful field you can add to a registration form. It lets you verify in seconds whether an applicant has a real audience before approving them. Someone with a genuine blog, YouTube channel, or social following will have no problem providing this. Someone who wants to abuse your program for self-referral discounts typically does not have a relevant online presence to point to. This field is the most effective quality filter available with minimal friction cost.
A short text field asking the applicant to describe their audience and how they plan to promote your store takes less than two minutes to fill in and gives you valuable context for the approval decision. It also has a psychological effect: someone who is serious about joining your program will write a thoughtful response, while someone who wants to game the system will either skip it (if the field is optional) or write something dismissive that makes the decision easy. Keep this field optional for customer referral programs but recommended for external affiliate programs.
A dropdown asking applicants to select their primary channel (blog, YouTube, Instagram, TikTok, email newsletter, podcast, other) adds minimal friction and gives you aggregate data about where your affiliates plan to promote. This helps you prepare appropriate creatives — you will know, for example, that 40% of your affiliates plan to use Instagram and can prioritize square-format product images accordingly. It also signals something about the applicant’s seriousness: someone who has a clear channel in mind is more likely to actively promote than someone who selects “other” with no further detail.
If audience reach is important to your program, a simple multiple-choice question about approximate following size (under 1,000 / 1,000–10,000 / 10,000–100,000 / over 100,000) adds useful context without requiring the applicant to share exact figures they may not want to disclose publicly. Be careful not to weight this field too heavily — a micro-influencer with 2,000 highly engaged followers in your exact niche is often more valuable than someone with 50,000 followers in a tangentially related space.
Phone number (unnecessary friction, creates GDPR obligations), mailing address (not needed for a digital affiliate program), tax information (collect this at payout time, not registration), date of birth (no legitimate purpose at registration), and any field where the answer will not change your approval decision. Every field that does not help you approve the right people is a field that costs you applicants.
Step 3: Create the registration page in WordPress
With the form configured in the plugin settings, the next step is creating the WordPress page where it will live. This is a standard WordPress page — create it in Pages → Add New with whatever page builder or classic editor your store uses.
Set the page slug to something clean and memorable: /affiliate-program or /affiliates or /join. Avoid auto-generated slugs that include dates or random characters. The URL will appear in your affiliate recruitment communications, on packaging inserts, and in any promotional materials that mention the program — a clean URL is easier to share and remember. It also contributes to the SEO keyword presence of the page, since the URL is one of the signals search engines use to understand what a page is about.
Affiliate Engine provides a shortcode for embedding the registration form on any WordPress page. Place the shortcode in the page content below your program description and the form renders automatically in the page frontend. The shortcode method works with any WordPress theme and any page editor. For the block editor (Gutenberg), add a Shortcode block and paste the code. For classic editor, paste directly into the content area in Text view.
If your store uses Elementor, Affiliate Engine includes a dedicated Elementor widget for the registration form. Drag the widget into your page layout from the Affiliate Engine widget category in the Elementor panel. The widget method gives you more layout control — you can position the form in a multi-column layout alongside program description text, arrange it with your brand’s visual style, and control spacing more precisely than with a shortcode in a text block.
After embedding the form, preview the page in a logged-out browser session to see exactly what a prospective affiliate will see. Check that the form fields display in the correct order, the labels are clear, and the submit button is visible without scrolling on a typical screen. Then test the form submission itself — fill it in and submit, verify that the submission appears in the admin Requests tab, and confirm that the confirmation message shown to the applicant after submitting is clear and tells them what to expect next.
Step 4: Configure the notifications for applicants
After an applicant submits the form, they will receive a notification email — either an immediate confirmation that their application was received (if you use manual approval) or an immediate approval notification with their affiliate link (if you use auto-approval). These emails are configured in the Notifications settings tab.

The submission confirmation email (sent immediately after the form is completed, before approval) should do two things: confirm the application was received and set expectations about the timeline. A message like “Thanks for applying to our affiliate program. We review applications within 48 hours and will send you a follow-up email once your application is reviewed” is all you need. Applicants who know what to expect do not send “did you get my application?” follow-up emails.
The approval notification email (sent when you approve the application in the Requests dashboard) is more important from an onboarding perspective. This email should include: the confirmation they are approved, their affiliate link directly in the email body, a brief reminder of the commission rate and payout schedule, a link to their dashboard, and a contact method if they have questions. Do not make them hunt for this information — include it all in the first email they receive after approval.
Step 5: Review and approve applications from the Requests dashboard
Once the registration page is live and applications start coming in, the Requests tab in the admin dashboard is your daily approval interface. This is where every application lands for review, and where the custom field data you configured becomes immediately useful.

For each application, you see the applicant’s name, email, the custom field data they submitted (website URL, channel description, audience notes), and the submission date. Review the website or social profile they provided — open it in a new tab and spend thirty seconds understanding who they are and what their audience looks like. This thirty-second check is what separates a well-maintained affiliate list from a list full of inactive or low-quality approvals.
Aim to review applications within 48 hours of submission. The period immediately after someone applies is when their enthusiasm is highest — they just decided they want to join your program. A week-long wait creates distance and loses momentum. Set a calendar reminder to check the Requests tab every other day, and process applications as a batch task rather than one-by-one as they arrive.
Registration page SEO: driving organic traffic to your program
People actively search for affiliate programs in their niche. Searches like “home decor affiliate program,” “fitness supplement affiliate program,” and “WordPress plugin affiliate program” are entered by content creators looking for programs to join. If your registration page ranks for these queries, it recruits continuously without any active outreach on your part.
The page title (the SEO title in your Yoast or Rank Math settings) and the H1 heading on the page should both include your product category alongside “affiliate program.” For example: “Natural Skincare Affiliate Program — Earn 20% Commission” or “WooCommerce Plugin Affiliate Program — Join and Earn.” This tells search engines what the page is about and gives your ideal affiliates the exact keywords they are searching for.
Link to your affiliate registration page from your site footer, your store’s main navigation (if space allows), and from any blog posts or product pages that are relevant to potential affiliates. Internal links signal to search engines that the registration page is important and help it accumulate the authority it needs to rank for affiliate program searches in your niche. The more internal links pointing to the page, the more seriously Google treats it.
A registration page with only a form and a three-sentence description is unlikely to rank well. Aim for at least 300 to 400 words of genuine program description text above the form. Include natural mentions of your product category, the types of creators your program suits, and what makes your commission structure competitive. This content does not need to be long — it needs to be informative and naturally include the phrases that potential affiliates search for.
What happens after approval: the dashboard experience
The registration page and form are the beginning of the affiliate’s relationship with your program, not the end. Once approved, the affiliate’s experience moves to their dashboard inside the WooCommerce My Account area. The quality and clarity of that dashboard determines whether a newly approved affiliate becomes an active promoter or a passive name on your affiliate list.
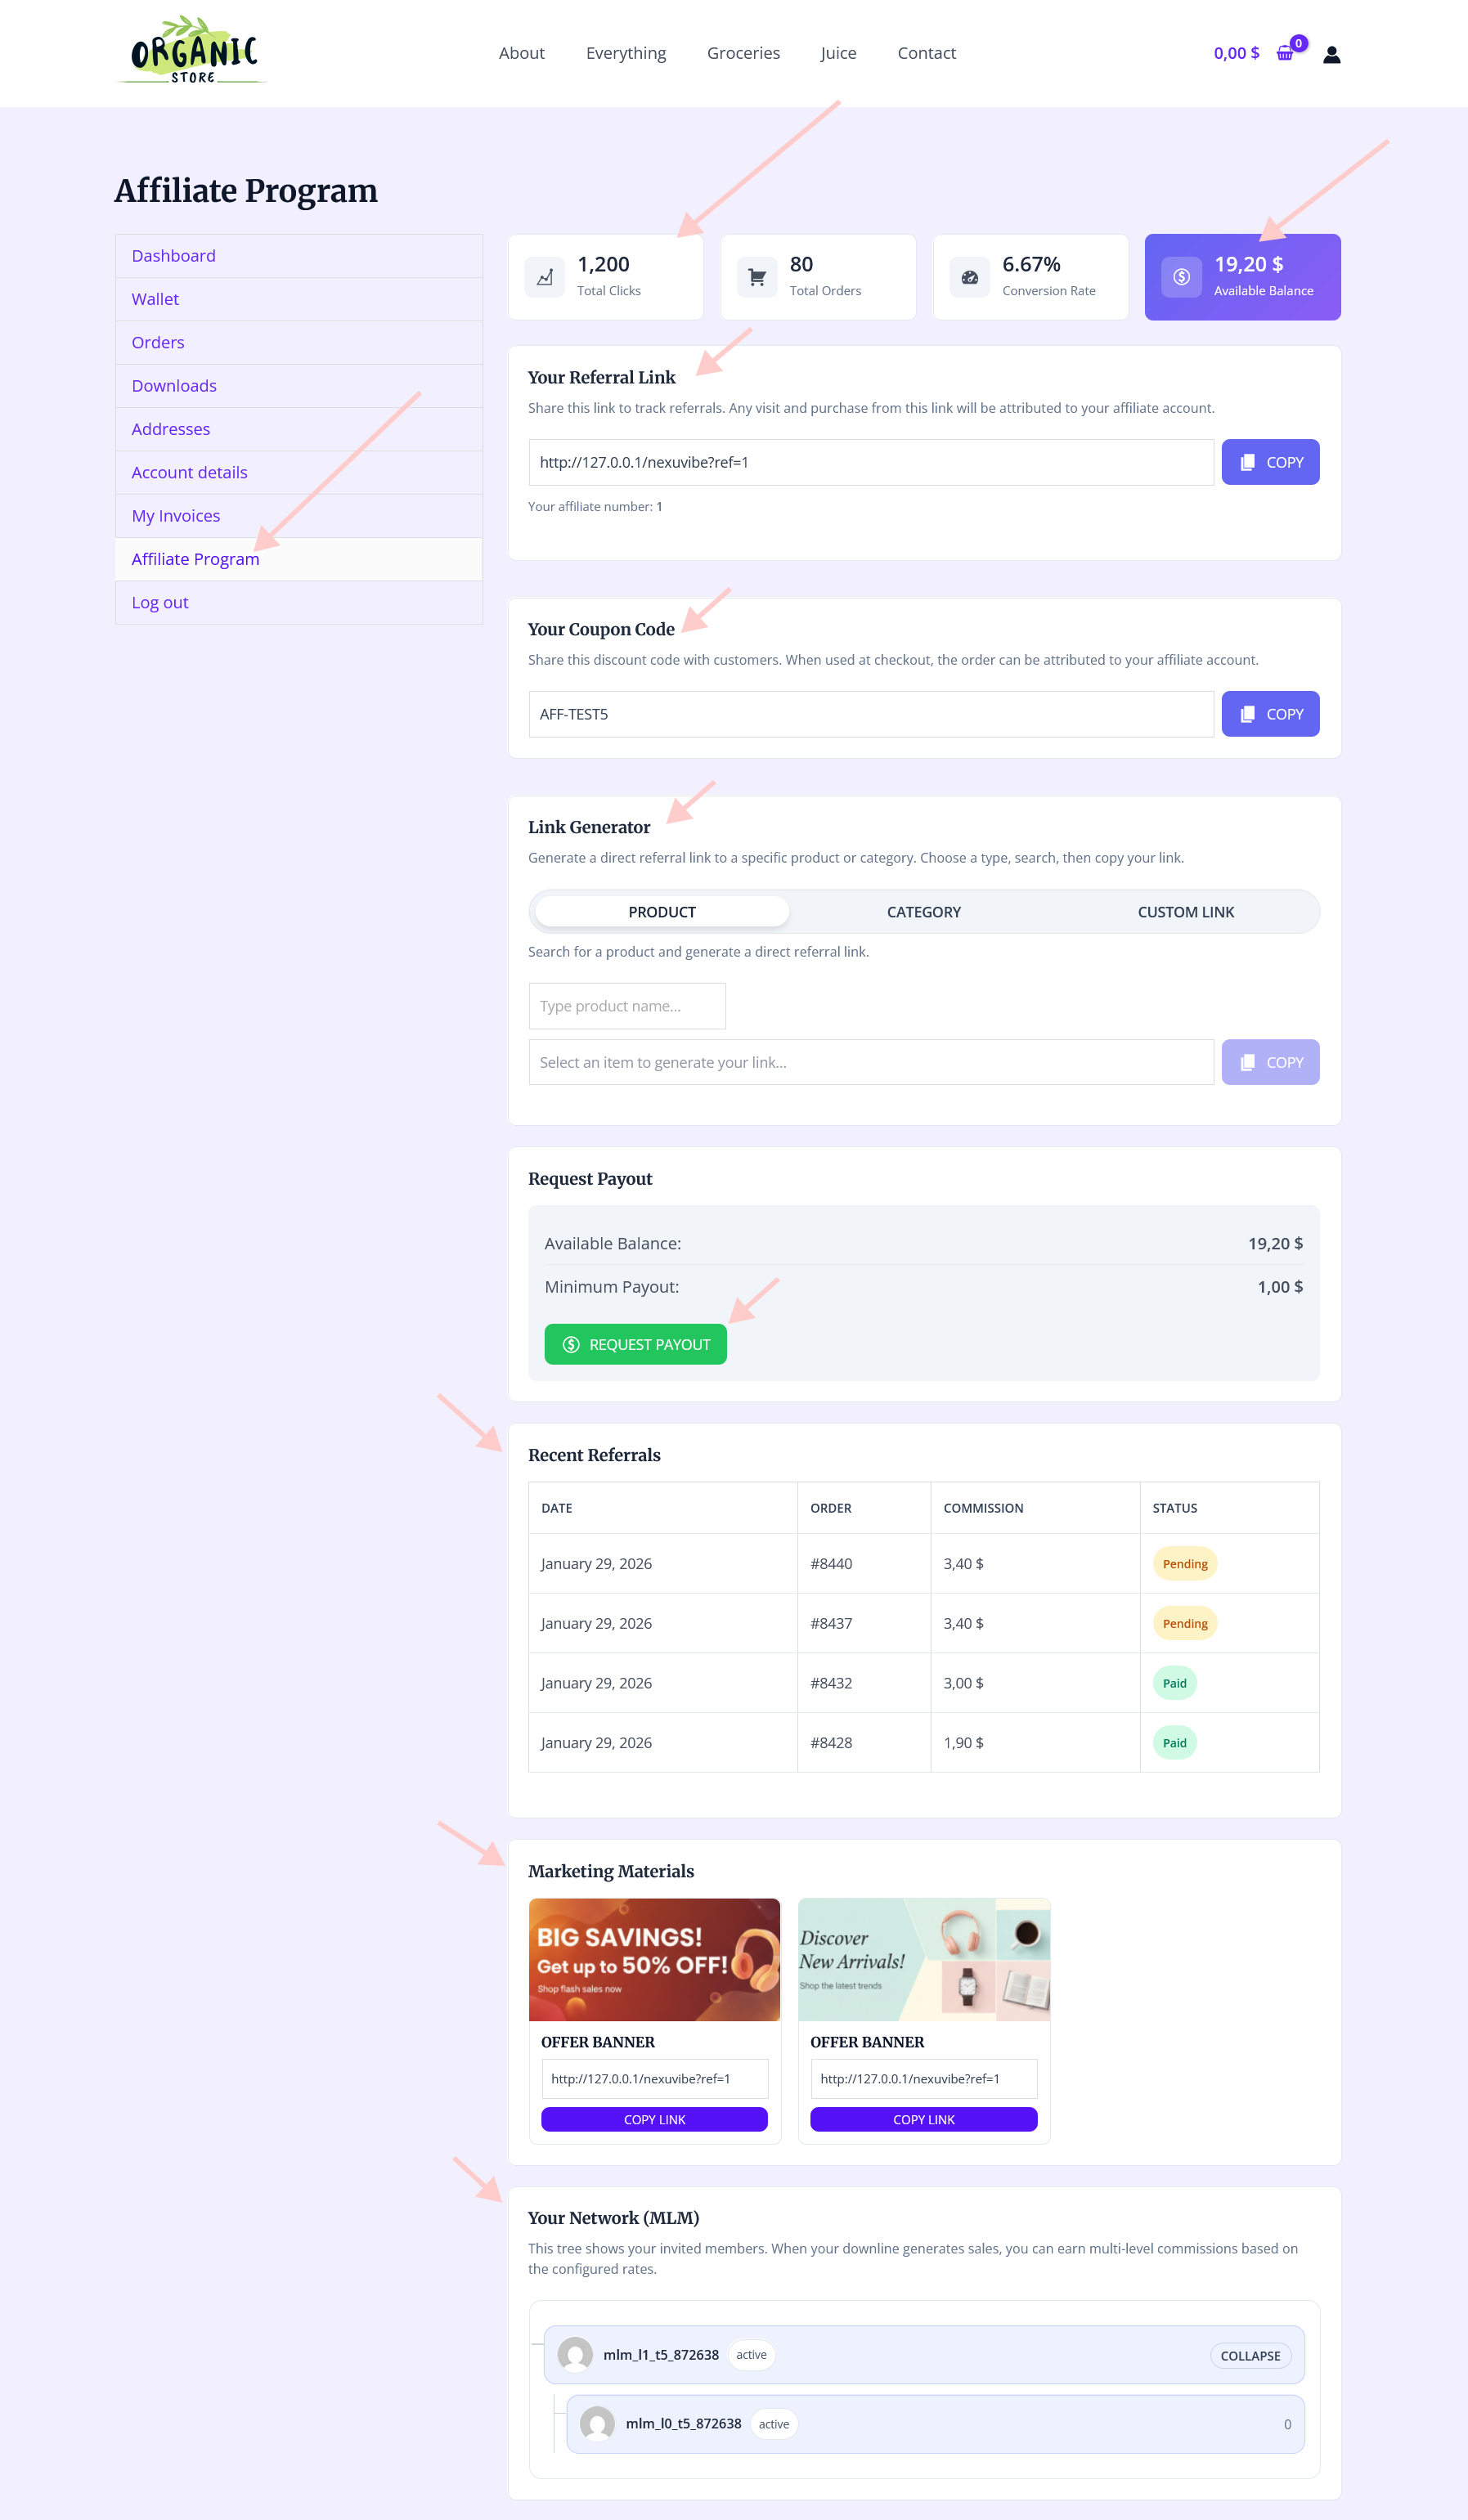
The moment an affiliate is approved and clicks through to their dashboard for the first time is the highest-intent moment in their entire lifecycle with your program. They are enthusiastic, they just received their approval email, and they are looking for their link so they can start sharing. If the first thing they see is a clean dashboard with their referral link prominently displayed, a copy button, and clear information about their commission structure, that momentum carries forward. If they see an empty, confusing, or poorly organized interface, the momentum dissipates — often permanently.
Registration page checklist: everything to verify before going live
The affiliate registration page is an investment that pays off over the entire life of your program. A page that is well-structured, clearly written, search-optimized, and connected to a smoothly configured form recruits continuously — through your own email list, through search engines, through word of mouth from existing affiliates, and through any recruitment outreach you do that points people to the URL. The time spent building it properly is returned many times over in the quality and volume of affiliates your program attracts.
Affiliate Engine’s WooCommerce affiliate registration and partner onboarding plugin provides the registration form via shortcode and Elementor widget, configurable custom fields, approval mode settings, notification email configuration, and the Requests dashboard where applications are reviewed — everything needed to build and operate a high-quality affiliate registration flow from day one.
Build an affiliate registration page that attracts the right people and filters the rest
Affiliate Engine gives you a configurable registration form with custom fields, shortcode and Elementor widget embedding, approval mode settings, notification emails, and a Requests dashboard for reviewing applications — all the infrastructure for a quality affiliate registration flow.





Just had to say this guide was an absolute lifesaver for my trucking merch store's affiliate program. most plugins just slap a boring form on a page and call it a day, but yours actually explains how to make the registration work for you not just sit there. The tip about treating it like a conversion page really clicked for me. I added custom fields with niche questions (like "Do you serve truckers?") and suddenly got way better applicants no more sketchy signups. totally worth the 11 minute read!
I was really hoping this guide would help me set up a clean affiliate registration page, but I hit a snag. The instructions assume you've already configured the registration settings in the plugin before creating the page, which feels backwards. most of us probably want to build the page first, then tweak the fields. also, 11 minutes is a long read just to get started could use a quick start section for busy folks. Still, the custom fields part was useful once I figured it out
This is backwards.
Just finished setting up my first affiliate registration page with this guide, and wow that tip about configuring the settings before building the page was a really helpful. I had no idea those little toggles (like approval mode and field visibility) actually determine who signs up and how committed they are. i'll admit, I skimmed it at first (like we all do), but the way it explains what each setting really does made me go back and read it twice. No fluff, just straight to the point steps