
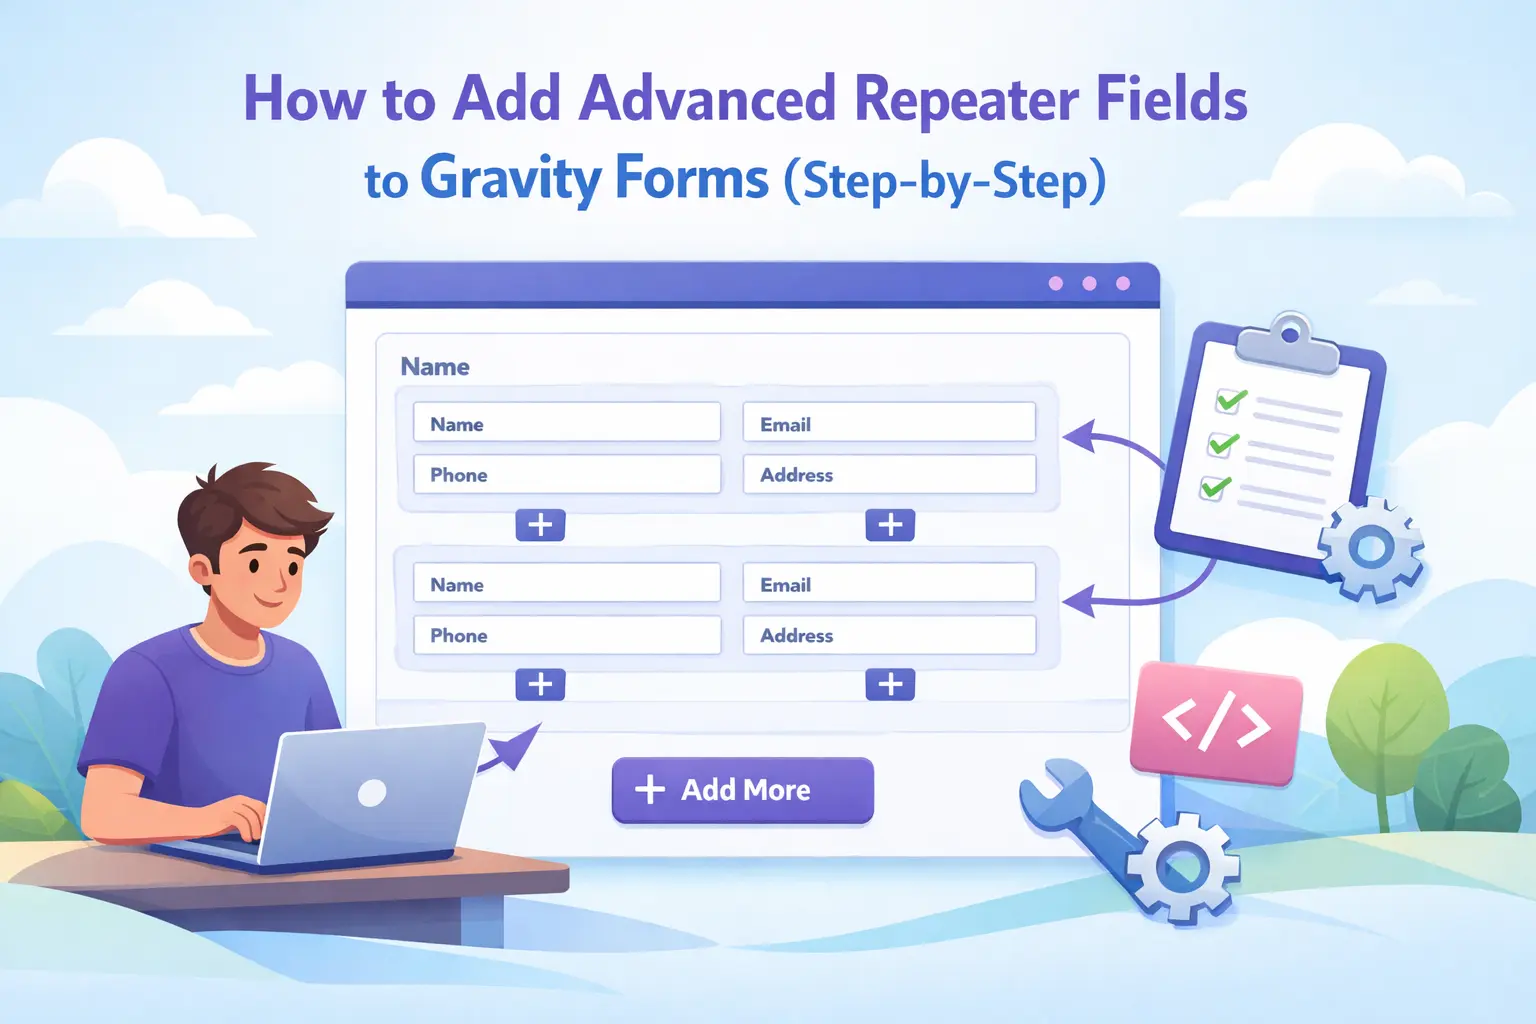
If you have worked with Gravity Forms for any meaningful amount of time, you have probably hit this wall: a client needs a form where users can add multiple entries of the same group of fields. Maybe it is a list of employees, a set of product line items, multiple addresses, or repeated sets of qualifications. The moment you try to build that inside a standard Gravity Forms layout, things get uncomfortable fast.
You end up duplicating fields manually, guessing how many copies a user might need, and hoping the entry view on the admin side remains readable. It rarely does. The native Gravity Forms Repeater field has been in beta since version 2.4, and it still requires developer-level implementation with no visual builder support. For most site owners and agencies, that is not a practical solution.
This guide walks through a practical, step-by-step approach to adding advanced repeater fields to Gravity Forms using a plugin that handles this from the form builder itself, without writing code. We will cover the setup, the frontend experience your users get, the admin-side entry view, and the specific configuration choices that matter for real-world forms.
The plugin we are using throughout this tutorial is NEXU Advanced Repeater for Gravity Forms with nested fields and dynamic row management. It takes a different approach from most repeater solutions by keeping the entire workflow inside the Gravity Forms editor, using start and end markers to define repeatable sections.
Why the built-in Gravity Forms repeater still falls short
Gravity Forms introduced a repeater field in version 2.4. On paper, it sounds like exactly what you need. In practice, it has remained in beta for years, and the gap between what it promises and what it delivers is significant enough that most non-developer users cannot use it at all.
The core limitation is that there is no form editor UI for the native repeater. You cannot drag and drop it into your form like other fields. You need to build it programmatically, which means writing PHP code that defines the field structure, the sub-fields, and the repeater behavior. For agencies building client sites or site owners managing their own forms, this is not a reasonable expectation.
Beyond the UI gap, the native repeater also lacks support for conditional logic, calculations, file uploads, and dynamic population. These are not edge-case features. They are things that most real-world repeater scenarios actually need. A form that collects a list of team members with conditional fields based on role, or an order form with per-row price calculations, cannot be built with the native repeater as it currently exists.
Some people try to use the Gravity Forms List field as a workaround. It lets users add rows of data in a table-like format. But it only supports simple text columns, stores data as serialized strings that are difficult to work with, and does not support the field types you would actually want in a repeatable section: dropdowns, date pickers, file uploads, or number fields with calculations. It is fine for collecting a short list of names. It is not a real repeater.
This is the gap that third-party repeater plugins fill. And the approach matters: some solutions use a “nested forms” model where you create a separate child form and embed it. That works, but it adds complexity to your form management. The approach we are covering here uses inline start and end markers within a single form, which keeps things simpler for most use cases.
Step 1: Install the repeater plugin and open the form editor
After installing and activating the NEXU Advanced Repeater plugin for Gravity Forms dynamic lists and nested fields, open the Gravity Forms editor for the form where you want to add repeatable fields. You will notice two new field types available in the field palette: a Repeater Start field and a Repeater End field. These two markers are the foundation of the entire setup.
The concept is straightforward. Everything you place between the start marker and the end marker becomes a single “row template.” On the frontend, users see one copy of that template, with a button to add more rows. Each new row is an exact copy of the template, and users can fill in different values for each row.
This is the same mental model you would use if you were building a spreadsheet: you define the columns once, and users add as many rows as they need. The difference is that here, each “column” can be any Gravity Forms field type, not just a text input.
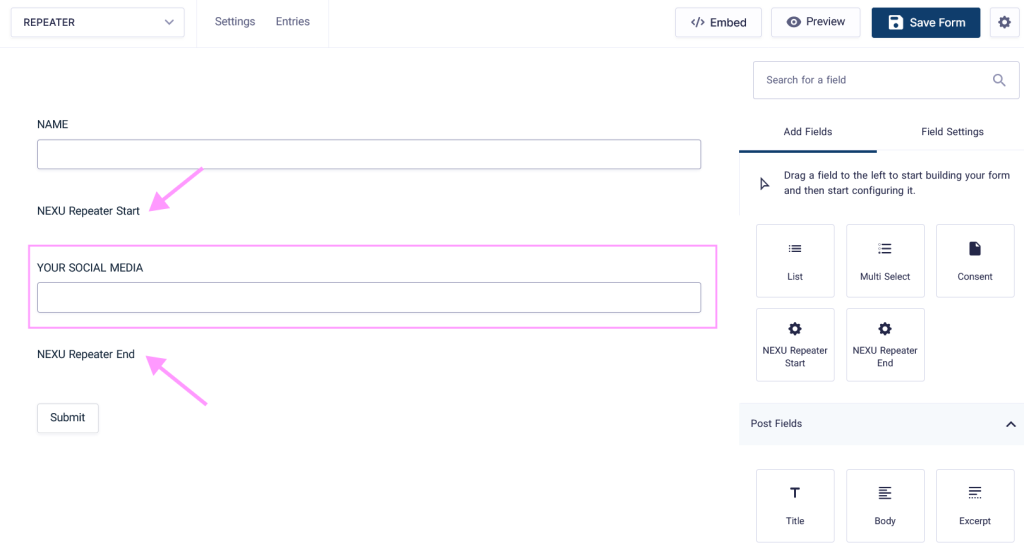
Drag the Repeater Start field into your form at the position where the repeatable section should begin. This marker tells the plugin where the row template starts. You can label it with something descriptive like “Team Members” or “Line Items” so you remember what this section is for when you return to the form later.
Now add the fields that should repeat as a group. These can be text fields, dropdowns, number fields, date pickers, or any standard Gravity Forms field type. For example, if you are collecting a list of participants, you might add a Name field, an Email field, and a Dropdown for dietary preference. These fields become one row in the repeater.
Drop the Repeater End field below the last field in your repeatable group. This closes the repeater section. Any fields placed after this marker are normal, non-repeating fields in your form. The start and end markers create a clear visual boundary in the editor, so you always know which fields are part of the repeater and which are not.
Step 2: What your users see on the frontend
The best way to evaluate a repeater plugin is not by looking at the settings panel. It is by looking at what the person filling out the form actually experiences. If the frontend feels awkward or confusing, users will abandon the form or submit incomplete data. Neither outcome is useful.
With this setup, users see the first row of fields already visible when the form loads. Below the row, there is a clear “Add Row” button. Clicking it smoothly adds another copy of the field group, with an animated transition that feels natural rather than jarring. Each row also has a remove button, so users can delete a row they added by mistake without having to reload the form.

The important thing here is that the form does not feel overloaded. Users who only need one row see a simple, short form. Users who need ten rows can add them without the form becoming a wall of fields from the start. This dynamic behavior is what separates a repeater from the old approach of duplicating fields at design time and hoping you guessed the right number.
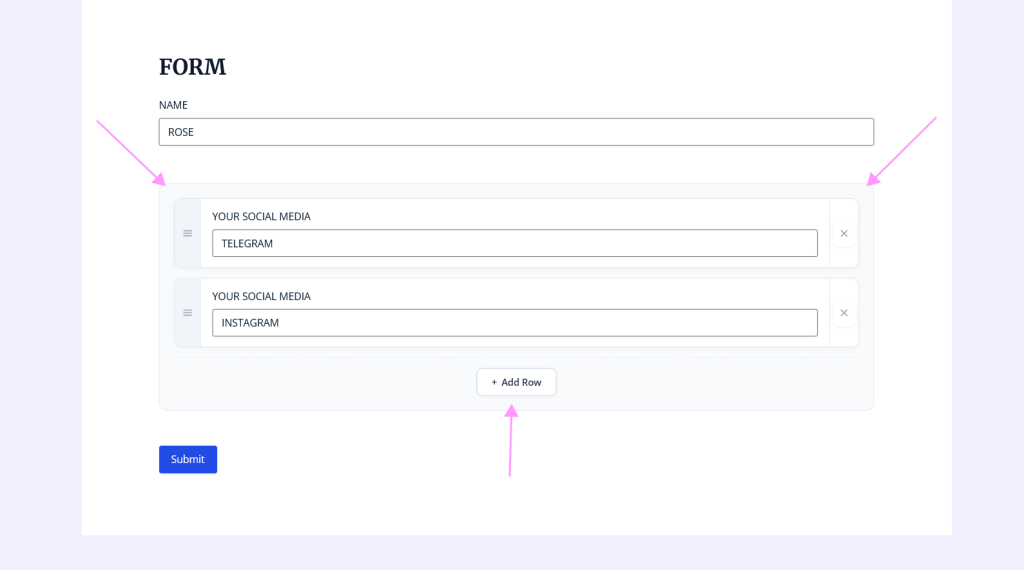
If you have ever used a form that forced you to scroll through 15 empty address blocks to fill in just two, you understand why this matters. A form that adapts to the user’s actual needs feels respectful of their time. And forms that respect people’s time get completed more often.
Step 3: Review entries on the admin side
Collecting repeated data is only half the problem. The other half is reviewing it. If the repeated data shows up in your entry view as a raw JSON string or a long, unstructured list of field values, you have traded one problem (a bad frontend) for another (a bad backend).
This is where the structured storage approach makes a real difference. Instead of creating separate entry fields for each row (which clutters the entry view), the repeater stores all rows as a single structured value. In the admin entry detail view, this appears as a readable table where each row of data is displayed as a row in the table. You can see all the repeated entries at a glance without scrolling through a fragmented layout.
For teams that process form submissions daily, this is not a cosmetic improvement. It is the difference between spending 30 seconds understanding a submission and spending 3 minutes trying to piece together which values belong to which row. Over hundreds of submissions, that adds up to hours of wasted time.
The entries list view also benefits from this approach. Instead of showing dozens of columns for repeated fields, the repeater data appears as a compact summary. You can quickly scan submissions without the entries table becoming impossibly wide.
Real-world use cases that actually need repeater fields
Repeater fields are not a feature you add to a form because it sounds advanced. They solve specific problems that come up constantly in real projects. Here are the scenarios where a repeater is not just nice to have, but genuinely necessary.
A company registers a team for a conference. The person filling out the form needs to enter a name, email, and session preference for each attendee. They might be sending 3 people or 12. A repeater lets them add exactly the right number of rows without the form designer guessing in advance.
A wholesale buyer submitting a purchase order needs to list products, quantities, and notes for each item. The number of items varies by order. A fixed form with 20 product slots wastes space for small orders and is not enough for large ones. A repeater adapts to each order naturally.
An applicant needs to list previous employers, job titles, dates, and responsibilities. Some people have two previous jobs, others have eight. A repeater handles both without making the form feel overwhelming for the person with a shorter history.
A property manager submitting a building profile needs to list each unit with its type, square footage, rent, and availability status. A repeater turns what would be a separate form per unit into one submission that captures the entire building.
A member registration form where users can add links to their social media profiles: platform name, URL, and username. Some users have two profiles. Others have seven. A repeater makes both cases feel normal rather than forcing everyone through the same rigid layout.
Calculations inside repeater rows
One of the most common requirements for repeater fields is per-row calculations. Think of an invoice form where each row has a quantity field and a unit price field, and you need the row total to update automatically. Or a project estimate form where each task has an hours field and a rate field.
This is where many repeater solutions break down. The native Gravity Forms repeater explicitly does not support calculations. Most third-party solutions either skip this feature or implement it in a way that breaks when users add or remove rows dynamically.
The Gravity Forms repeater addon with dynamic calculations and multi-row inputs handles per-row calculations so that each row computes independently. When a user changes a value in one row, only that row’s calculation updates. The total across all rows can also be computed and displayed in a summary field outside the repeater section.
This is not a theoretical feature. For any form that involves quantities, pricing, or scoring, per-row calculations are what make the difference between a form that works and one that requires manual post-processing of every submission.
Handling file uploads within repeated rows
File uploads inside repeater rows is another scenario that sounds simple but is technically difficult. When a user adds a new row and uploads a file in that row, the form needs to handle the upload correctly, associate it with the right row, and store it in a way that the admin can identify which file belongs to which entry.
Many repeater implementations handle this poorly, or not at all. The native Gravity Forms repeater does not support file upload fields. Third-party solutions that do support uploads sometimes lose the file association when rows are reordered or deleted, leading to submissions where files are attached but nobody can tell which row they came from.
If your use case involves collecting documents per row (like a form where each team member uploads their certification, or each line item needs a supporting invoice), this is worth testing carefully before committing to a solution. The upload needs to stay associated with its row through submission, through entry display, and through export.
Email notifications and merge tags with repeated data
When a form is submitted, Gravity Forms sends notification emails using merge tags that pull in field values. With a standard form, this works seamlessly. With repeated data, it can break down if the repeater does not generate proper merge tags.
The goal is for the notification email to display the repeated data as a readable table or structured list rather than a raw data dump. When someone on your team receives the notification, they should be able to scan it and understand the submission without having to log into the WordPress admin. A repeater that generates proper merge tag output means your email notifications actually serve their purpose.
You can also use merge tags to display just a row count rather than the full table, which is useful for subject lines or short confirmation messages. For example, the email subject could read “New registration: 4 attendees” rather than listing every name.
Comparing repeater approaches: which method fits your project
There are several ways to handle repeating data in Gravity Forms, and each has tradeoffs. Understanding them helps you choose the right approach for your specific situation rather than defaulting to whichever plugin you hear about first.
The Gravity Wiz Nested Forms approach is a solid solution if you need full child-entry independence, where each repeated row is its own entry with its own feeds and notifications. It is more complex to manage because you are working with two forms (a parent and a child), but for workflows that genuinely need per-row processing, it is a strong option.
The NEXU Advanced Repeater takes a simpler approach: one form, start and end markers, structured storage. For the majority of use cases where you just need users to add multiple rows of the same field group and you want clean entry data on the admin side, this is the more practical path. It does not require managing a separate child form, and the setup stays within the standard Gravity Forms editing workflow.
Tips for building better repeater forms
After setting up the technical side, there are a few design decisions that make the difference between a repeater form that works and one that works well. These come from real projects where forms collect hundreds or thousands of submissions.
Resist the urge to put every possible field inside the repeater. Each field in the row template is multiplied by every row the user adds. Five fields per row times ten rows is 50 field interactions. Only include fields that genuinely need to vary per row. Anything that stays the same across rows belongs outside the repeater section.
Most use cases have a practical ceiling. An event registration probably does not need more than 50 attendees per submission. An order form might cap at 30 line items. Setting a maximum prevents edge cases where someone accidentally adds hundreds of rows and makes the form unusable. It also helps you plan for how the entry data will look on the admin side.
Repeater fields are more challenging on small screens than single fields. A row with four columns that looks clean on desktop can become hard to navigate on a phone. Test your form on a real mobile device and consider reducing the number of fields per row if the mobile experience feels cramped. Users increasingly fill out forms on their phones, especially for event registrations and quick submissions.
Before going live, submit the form with multiple rows filled in and review the notification email. Make sure the repeated data appears in a structured format rather than as a raw data dump. This is the first thing your team will see when a submission comes in, so it needs to be immediately readable.
Getting started with repeater fields today
Adding repeater fields to Gravity Forms does not need to be a developer project. The core workflow is simple: define your repeatable section with start and end markers, place the fields you want repeated between them, and let the plugin handle the frontend interaction and the backend storage. The complexity is in the details, and those details are where your choice of plugin makes the real difference.
If your forms collect any kind of variable-length data, whether that is a list of people, a set of items, multiple addresses, or repeated measurements, a properly implemented repeater will save time for both your users and your team. The form becomes shorter and more focused. The submissions become structured and reviewable. And you stop spending time on manual data cleanup that a better form could have prevented.
Stop duplicating fields. Start repeating sections.
NEXU Advanced Repeater gives your Gravity Forms the ability to collect dynamic, multi-row data with a clean frontend, structured storage, and readable admin entries.





Wait so do I even need a plugin
Saved me hours of copying fields by hand. works right in the editor so smooth.
Hey everyone! I just had to leave a quick shoutout for this repeater fields solution. I've wrestled with Gravity Forms for years trying to hack together repeatable sections, and this approach with inline start and end markers is so much cleaner. No more guessing how many rows a client might need users can add or remove them on the fly, and the form stays nice and tidy. finally, a setup that doesn't require a developer or look like a total mess on the backend! So glad I grabbed it during the sale
I was really hoping this would solve my repeater field headaches, but it's just another workaround that falls short. The List field isn't a true repeater it's clunky for anything beyond basic name lists. tried using it for employee qualifications, and the frontend experience was confusing for users adding/removing rows. admin view? forget it. Still stuck manually duplicating fields like before. Not the fix I needed.