Next-Level Code. Nexuvibe Style ...
Hrs
Min
Sec

Most forms are flat. You have a list of fields, the user fills them in from top to bottom, and you receive a single entry with one value per field. That works for contact forms, simple signups, and feedback surveys. But the moment your data has structure, when one thing contains many other things, flat forms start to break.
Think about what happens when you need to collect a team registration where one submission contains multiple players. Or a vendor application where a single business lists multiple product lines. Or a project intake form where each project has multiple milestones, and each milestone has its own budget and timeline. These are not edge cases. They are the kinds of forms that agencies and businesses build every day. And they all require the same thing: the ability to nest a group of related fields inside a parent form, let users repeat that group as many times as needed, and keep the submitted data organized in the entry view.
In the world of Gravity Forms, this concept is called nested fields, and it has been one of the most requested features for years. This guide covers everything you need to know about building nested fields in Gravity Forms: the available approaches, their tradeoffs, and a practical walkthrough using a plugin that makes this work from the visual form editor without writing code.
We will be using the NEXU Advanced Repeater plugin for creating nested fields and dynamic lists in Gravity Forms throughout this guide, but we will also explain how the concept applies regardless of which solution you choose.
The term “nested fields” gets used loosely in the WordPress forms space, and this creates genuine confusion. People use it to mean at least three different things, and understanding the distinction matters because each one leads to a different solution.
This is what most people actually mean when they say “nested fields.” They want to group two or more fields together (like Name + Email + Phone) and let the user add multiple instances of that group. The fields are “nested” inside a repeatable container. A parent form contains a child section that can be duplicated. This is the most common real-world need and the one this guide focuses on primarily.
This is the approach where you literally embed one Gravity Form inside another. The child form is a separate form with its own entry, its own feeds, and its own notification processing. This is more powerful but also more complex. Each child submission creates a separate entry that is linked to the parent. The Gravity Wiz Nested Forms plugin uses this model.
The deepest version of nesting: a repeatable group that itself contains another repeatable group. A company with departments, where each department has employees, where each employee has certifications. This is genuinely complex, and very few form builders handle it natively. The Gravity Forms native repeater supports this in theory, but the implementation is beta-only and code-level.
For the vast majority of WordPress projects, the first definition is what matters. You need a group of fields that users can repeat, with the data stored in a structured way that makes the admin entry view readable and the downstream processing clean. The rest of this guide is built around that practical reality.
Gravity Forms is one of the most established form builders for WordPress, and its core features are mature. But nested and repeatable fields have been a known gap for a long time. Understanding what Gravity Forms provides natively helps you evaluate what third-party solutions need to fill in.
The List field lets users add rows to a table with text-only columns. It is technically a repeater, but it only supports plain text inputs. You cannot put a dropdown, a date picker, a file upload, or any other Gravity Forms field type inside a List field column. The data is stored as a serialized string, which makes it difficult to query, export, or display cleanly. It works for collecting a quick list of names. It does not work for any structured data collection.
Gravity Forms introduced a Repeater field type in version 2.4. It supports nesting, multiple field types, and theoretically has no limit on depth. But it has been in beta for years and requires programmatic implementation. There is no drag-and-drop interface. You cannot add it from the form editor. Conditional logic, calculations, dynamic population, file uploads, and CSS Ready classes are all unsupported. For non-developers, this field type effectively does not exist.
The practical options for nested fields in Gravity Forms come from third-party plugins. These range from the Gravity Wiz Nested Forms plugin (which uses the child-form model with modal-based entry) to inline repeater solutions like NEXU Advanced Repeater that use start-and-end markers within a single form. Each approach has a different architectural philosophy, and the right choice depends on your specific workflow needs.
Before you pick a plugin, it helps to understand the two fundamentally different approaches to building nested fields. They are not interchangeable, and choosing the wrong one for your use case creates problems that are hard to fix later.
You create a separate “child” form with its own fields. On the parent form, you add a special field type that embeds the child form. Users click a button to open a modal, fill in the child form, submit it, and the child entry appears as a row in the parent form. Each child submission creates its own entry in the database.
Best for: complex per-entry workflows, separate feeds per child, full field type support including payment fields.
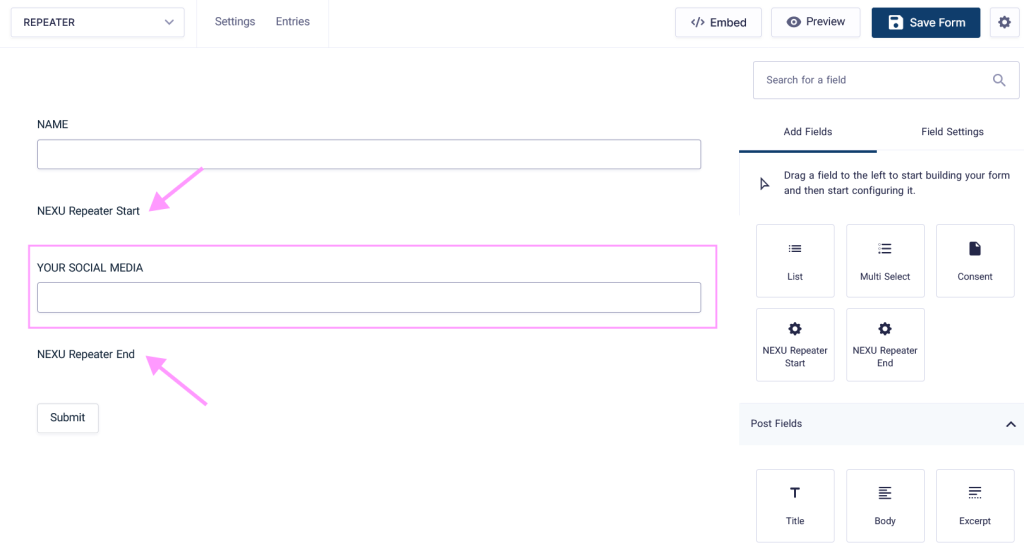
You define a start marker and an end marker inside the same form. Everything between those markers becomes a repeatable row template. Users add rows directly on the form page, without a modal. The repeated data is stored as a structured value within the parent entry. There is no separate child form to manage.
Best for: simpler setups, inline UX without modals, single-form management, readable structured entries.
The child-form model is the more powerful of the two. It supports independent feeds per child entry, which means you can trigger a user registration, a CRM update, or a notification for each repeated row individually. If your workflow genuinely needs per-row processing, this is the right architecture.
The inline-section model is simpler to set up, simpler to maintain, and produces a cleaner frontend experience. Users never leave the form page. There is no modal, no “submit child form” step, and no second form to keep in sync. For the majority of use cases where you just need repeatable field groups with clean data storage, this is the more practical choice.
The NEXU Gravity Forms nested fields plugin with inline repeatable sections uses the inline-section model, which is the approach we will walk through in the rest of this guide.
Let us walk through building a concrete example: a vendor application form where each vendor lists their product lines. The parent form collects the vendor’s company information, and the nested section collects one row per product line with fields for product name, category (dropdown), unit price (number), and a brief description (text area).
The setup follows three steps. First, add the parent form fields above the nested section: company name, contact person, email, phone number. These are standard Gravity Forms fields that appear once per submission. Second, add the Repeater Start marker where the nested section begins. Third, place the fields you want repeated between the start marker and the Repeater End marker: product name, category dropdown, unit price, description. Everything between those two markers becomes the row template.
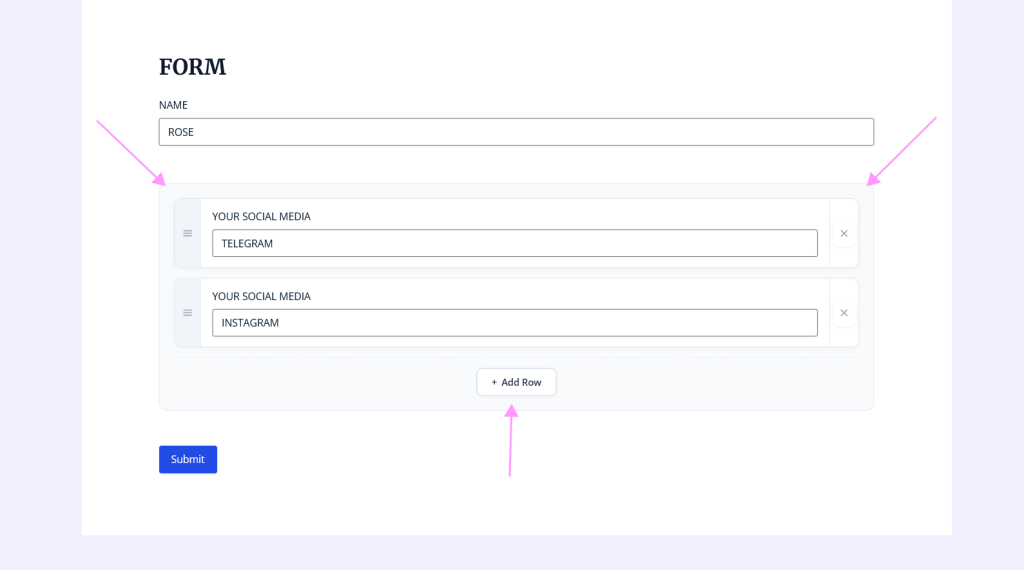
When a vendor opens this form, they see the company fields at the top, then one row of product fields, and an “Add Row” button. They fill in the first product, click Add Row, and a second identical set of fields appears. They can add as many products as they need. The form adapts to them, not the other way around.
The form builder setup only matters if the result is a frontend experience that users can navigate without confusion. This is where many repeater plugins reveal their rough edges: the backend works, but the frontend feels like an afterthought.
With the inline approach, users stay on the same page throughout. They see a clearly defined section with their first row of nested fields, an Add Row button that inserts a new row with a smooth transition, and a remove button on each row for corrections. There is no modal, no popup, no navigation away from the form. The experience feels like filling out a form, not operating a separate application embedded inside one.
This design choice has a direct impact on form completion rates. Modal-based nested forms work well for power users who understand the concept, but they introduce a step that can confuse people who are less comfortable with web forms. The inline model eliminates that cognitive overhead. Adding a row feels like adding a line to a list, which is a concept everyone already understands.
When the form respects the user’s mental model, they give you better data and submit more complete entries. That is not a design opinion. It is a pattern that shows up consistently across real-world form analytics.
Collecting nested data on the frontend is only half the story. The other half, and the one that affects your team every day, is how that data shows up when you open an entry, send a notification, or export submissions for processing.
When you open a form entry in the WordPress admin, the nested section should display as a readable table rather than a raw data dump. Each row the user submitted appears as a row in the table, with columns matching the fields in your repeater section. You can scan the data at a glance without scrolling through dozens of individual field entries. This structured display is the practical difference between reviewing a submission in 30 seconds and spending 3 minutes piecing together which values belong to which row.
Your notification emails need to present nested data in a readable format. A well-implemented repeater generates merge tags that output the nested rows as a formatted table or structured list in the email body. Your team should be able to understand the submission directly from the notification without needing to log into WordPress. You should also have the option to output just a row count for summary notifications or subject lines.
When you export entries to CSV or connect them to external tools, the nested data needs to maintain its structure. Dumping all nested rows into a single cell as one long string defeats the purpose of structured collection. A good implementation formats repeated rows so they can be parsed programmatically or imported into spreadsheets with the row structure preserved. If you use a Google Sheets connector, the integration should handle the nested data intelligently.
For forms that involve pricing, quantities, or scoring, you need calculations that work per-row (unit price times quantity equals line total) and across all rows (sum of all line totals equals order total). The Gravity Forms nested repeater with dynamic per-row calculations handles both levels: each row computes independently, and a summary field outside the repeater section can aggregate across all rows.
Theory is useful, but projects are built on specifics. Here are five nested field scenarios drawn from real projects, with notes on the configuration decisions that made each one work well.
Each applicant lists their academic background: institution name, degree type (dropdown), graduation year (date), and GPA (number). Some applicants have one degree, others have three or four. The nested section adapts to each applicant. The entry view shows a clean table of their educational history, which the review committee can scan immediately.
A catering business collects orders where each line item has a dish name (dropdown with their menu), quantity (number), dietary notes (text), and per-item price (calculated from the dropdown selection times quantity). The nested section handles the variable order length, and the calculation fields compute line totals and an order total automatically.
A property management company receives maintenance requests where tenants can report multiple issues in a single submission. Each row has a location in the building (dropdown), issue description (text area), urgency level (radio buttons), and an optional photo (file upload). The nested section replaces the old workflow of submitting separate tickets for each issue.
An insurance broker collects multi-vehicle quote requests where each vehicle has a make, model, year, VIN, and current coverage status. Families insuring four cars submit one form instead of four. The entry view shows all vehicles in one table, and the broker can assess the full picture without switching between separate submissions.
A staffing platform collects freelancer profiles where each person lists their past projects: project name, client name, role, duration, and a portfolio link. The nested section lets freelancers add as many projects as they want without the form imposing an arbitrary limit. The entries are structured enough to feed into a searchable directory.
Nested fields introduce complexity that flat forms do not have. These are the mistakes that show up most often in real projects, along with the decisions that prevent them.
Once the basic nested section is working, real projects often need additional capabilities inside the nested rows. These are the extensions that come up most frequently.
File uploads within nested rows are a common requirement. Think certification documents per team member, product photos per line item, or supporting evidence per reported issue. The technical challenge is ensuring the upload stays associated with its specific row through submission, storage, and display. The native Gravity Forms repeater does not support file uploads at all. Among third-party solutions, file upload support is one of the key differentiators to check before committing.
Row sorting is useful when the order of items matters. If users are ranking preferences, listing priorities, or building a sequence of steps, being able to drag and drop rows into the desired order adds meaningful value. If ordering is not relevant to your use case, keeping the interaction minimal by leaving sorting disabled is the better choice.
For integrations, the key question is how nested data flows to external tools. If you send form entries to a CRM, a project management tool, or a Google Sheet, the integration needs to handle the nested structure. A flat CSV export that dumps all nested rows into one cell is rarely useful. The NEXU nested fields repeater for Gravity Forms with structured entry export stores data in a structured format that downstream tools can parse, which keeps your integration pipeline clean.
There is no single “best” way to do nested fields in Gravity Forms. The right choice depends on your project’s specific requirements. Here is a framework for deciding.
If you need per-row processing, where each nested row triggers its own user registration, CRM entry, or notification, the child-form model (like Gravity Wiz Nested Forms ) is the stronger choice. It gives you independent entry management per child row, at the cost of managing two forms and a more complex setup.
If your need is simpler, grouping fields that users can repeat with a clean frontend and structured admin entries, the inline repeater model is faster to set up, easier to maintain, and produces a smoother user experience. One form, start and end markers, structured data storage. For the majority of nested field use cases in real WordPress projects, this is the practical choice.
If you are a developer who wants full control and does not need a visual editor, the native Gravity Forms Repeater API is an option, but be prepared to handle its limitations around conditional logic, calculations, and file uploads manually.
NEXU Advanced Repeater adds nested field groups to Gravity Forms with a visual builder, clean frontend rows, per-row calculations, and structured admin entries.







As a hospital admin dealing with complex intake forms, this guide finally made it clear why flat forms just don't work for structured data. Saved us weeks of trial and error.
This guide actually explains why nested forms in Gravity Forms are such a pain. The child forms vs. inline sections breakdown is super clear, but the beta restrictions still make it feel unfinished
Finally found a guide that actually explains how to handle nested fields in Gravity Forms for real world stuff like team registrations. The breakdown of how data moves through entries and notifications is super helpful saved me hours of trial and error