Next-Level Code. Nexuvibe Style ...
Hrs
Min
Sec

The default WooCommerce checkout page asks every customer the same questions regardless of what they are buying or who they are. For some stores, that works fine. For most, it does not. If you sell digital products, you do not need a shipping address. If you sell personalized items, you need fields that WooCommerce does not include out of the box. If you run a B2B store, you probably need a tax ID field that your retail customers should never see.
The problem is not that WooCommerce’s default checkout is bad. It is that it was built to be generic enough to work for everyone, which means it is not optimized for anyone. Every unnecessary field on your checkout page is a small friction point. Stack enough of those friction points together and you get cart abandonment. According to research from the Baymard Institute, the average documented online shopping cart abandonment rate is just under 70%. A significant portion of that abandonment happens at checkout, and form complexity is one of the leading causes.
This guide walks through how to customize your WooCommerce checkout fields from start to finish. We will cover removing unnecessary fields, adding custom ones, rearranging the form layout, using conditional logic, and setting up per-product fields. The approach here uses a visual WooCommerce checkout field editor with drag-and-drop and conditional logic rather than writing PHP code, which means you can do all of this without touching a single line of code.
The first result you get when you search for how to customize WooCommerce checkout fields is almost always a tutorial showing you PHP snippets to paste into your theme’s functions.php file. This approach works technically, but it creates several practical problems that matter more the longer your store operates.
Code snippets are fragile. A theme update can overwrite your functions.php changes. A WooCommerce update can change the hook priorities your snippet relies on. A second plugin that also modifies checkout fields can create a conflict that breaks the form entirely. When any of these things happen, your checkout page stops working and your revenue stops with it. Debugging the problem requires the same developer knowledge that created the snippet in the first place.
Beyond stability, code snippets do not offer any visual feedback. You write the code, save the file, reload the checkout page, and see whether it worked. If the field is in the wrong position, you go back and change a priority number, save, reload, check again. Conditional logic with code requires writing JavaScript or PHP conditionals that are difficult to test and easy to break.
A dedicated checkout field editor plugin solves all of these problems. Your customizations are stored in the database, not in theme files, so they survive updates. The visual interface gives you immediate feedback. Conditional logic is configured through a point-and-click builder. And if something goes wrong, a one-click reset puts everything back to default. For the rest of this guide, we will use the advanced WooCommerce checkout field editor plugin with per-product fields and conditional logic for all demonstrations.
Before you add or remove anything, open your current checkout page and look at it from a customer’s perspective. Count the fields. Identify which ones are genuinely necessary for your business to fulfill an order, and which ones are there simply because WooCommerce included them by default.
The standard WooCommerce checkout includes billing fields (first name, last name, company, country, street address lines 1 and 2, city, state, postcode, phone, email), shipping fields (a similar set), and an order notes field. That is roughly 20+ fields before you have added anything custom. For a digital product store, most of these are completely unnecessary. For a physical product store selling domestically, the “Company” and “Address Line 2” fields may be causing confusion more than they are helping.
Make a simple list. Write down each field and next to it write whether it is “essential,” “sometimes needed,” or “never needed” for your specific business. This list becomes your blueprint for the customization steps that follow.
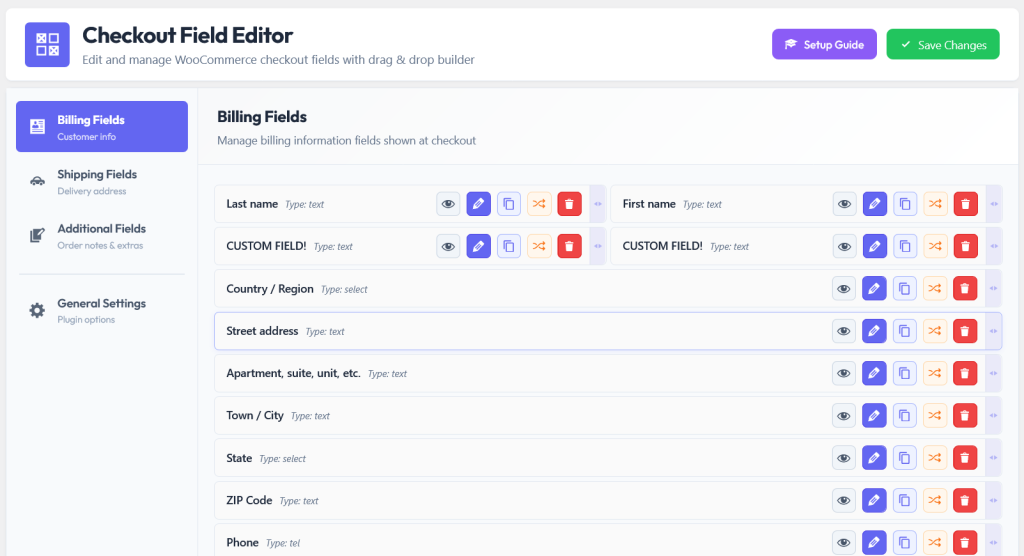
Once you know which fields are not needed, disabling them is the first action to take. This is where a visual editor immediately proves its value. Instead of writing a PHP filter to unset specific field keys from the checkout array, you simply toggle each unwanted field off.
Common fields that stores remove include the “Company Name” field (unless you run a B2B store), “Address Line 2” (which confuses many customers), and the “Phone” field (which many stores do not actually need for order fulfillment). Each field you remove makes your checkout form shorter and visually less intimidating.
An important distinction here: disabling a field is different from deleting it. When you disable a default WooCommerce field through the editor, it is hidden from the checkout form but the field definition is preserved. You can re-enable it at any time without reconfiguring anything. This is much safer than a code approach where removing a field and adding it back later means rewriting the snippet.
The next step is making the remaining fields work harder for you. Default WooCommerce labels are functional but generic. “Billing First Name” works, but depending on your store’s tone, “Your Name” or “Full Name” might feel more natural to your customers. Renaming fields to match your brand voice is a small detail that makes your checkout feel intentional rather than templated.
Field order matters more than most store owners realize. The email address field, for example, is one of the most important fields on your checkout page because it is the one piece of data that enables order confirmation, shipping notifications, and abandoned cart recovery. Yet WooCommerce places it near the bottom of the billing section by default. Moving it to the top of the form means you capture it early, even if the customer abandons the rest of the checkout.
With a drag-and-drop interface, rearranging fields is exactly as intuitive as it sounds. Grab a field, move it to the position you want, and the new order is saved. No priority numbers to calculate, no hook positions to memorize. You can also change placeholder text, which is the light gray hint text inside empty fields. Good placeholder text (“e.g., [email protected]”) reduces input errors and speeds up form completion.
This is where customization gets genuinely powerful. WooCommerce’s default fields cover the basics of billing and shipping. But your business probably needs information that the defaults do not collect. A florist needs a delivery date and a card message. A custom clothing shop needs measurements or sizing notes. A B2B wholesaler needs purchase order numbers or tax IDs.
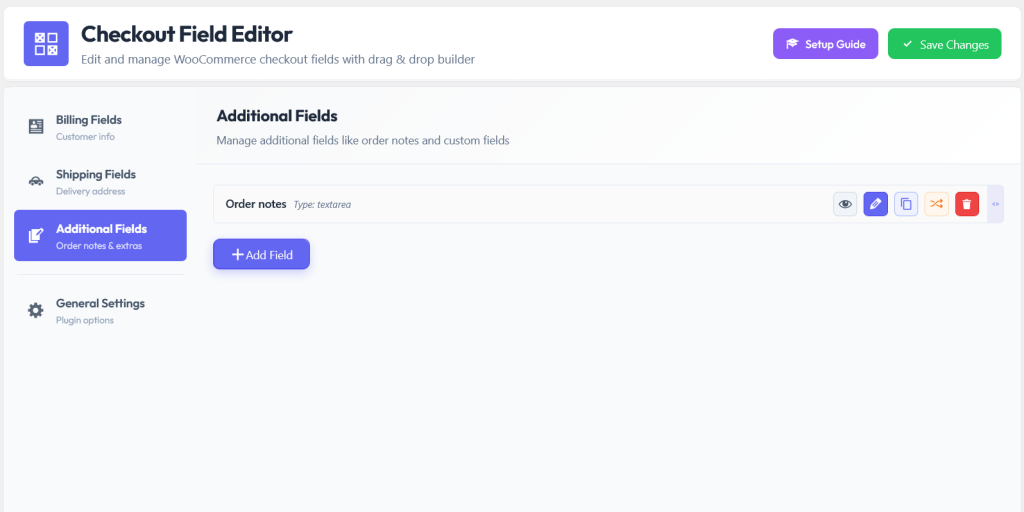
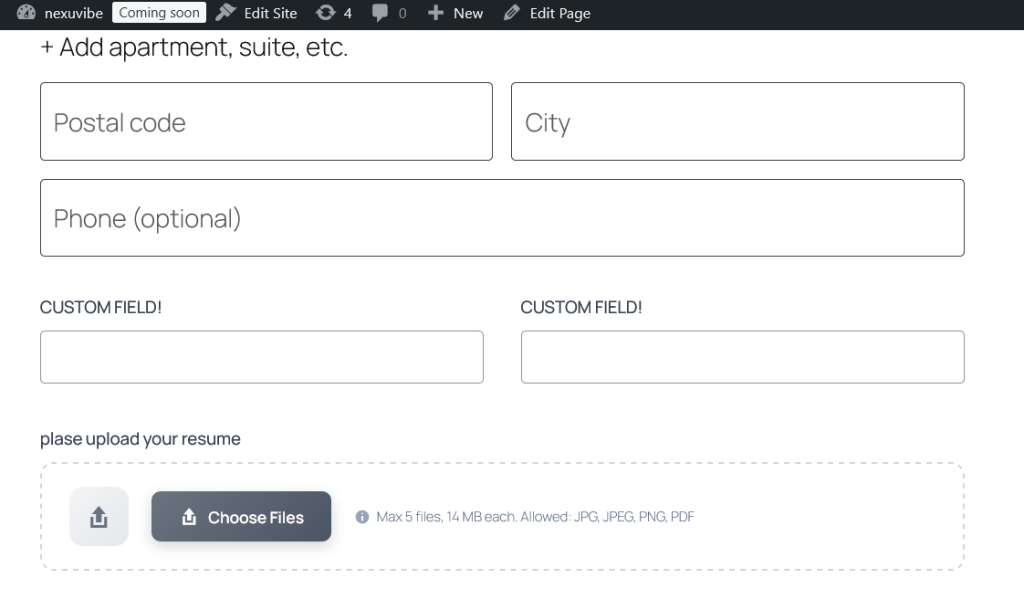
The types of custom fields you can add include text inputs and text areas for freeform responses (gift messages, special instructions), dropdown menus and radio buttons for predefined choices (delivery time slots, gift wrapping options), checkboxes for opt-in decisions (newsletter signup, terms agreement), date pickers for scheduling (delivery dates, appointment times), and file upload fields for document submission (business licenses, custom artwork files).
When adding a custom field, there are a few settings to configure thoughtfully. First, decide whether the field should be required or optional. Required fields guarantee you get the data, but they add friction. If a piece of information is nice to have but not essential for fulfillment, make it optional. Second, set up proper validation. If you add a phone number field, validate the format so you do not end up with entries like “asdfg” in your order data. Third, choose where the field appears: in the billing section, the shipping section, or as a standalone additional field below the rest of the form.
One detail that is easy to overlook: custom field data needs to show up in order confirmation emails and in the admin order detail panel, otherwise it is functionally useless. The plugin handles this automatically. When a customer fills in your custom field at checkout, that data appears in the order email they receive, in the email you receive as the store admin, and in the order details page inside WooCommerce. No additional configuration needed.
This is the feature that separates a basic checkout form from one that actually feels intelligent. Conditional logic means that your checkout form adapts in real time based on what the customer is doing. Fields appear when they are relevant and stay hidden when they are not.
Here are some practical examples of how conditional logic works on a checkout page. If a customer checks a “This is a gift” checkbox, a “Gift Message” text area and a “Delivery Date” picker appear below it. If they do not check the box, those fields stay invisible. If a customer selects “Local Pickup” as their shipping method, the shipping address fields disappear entirely because there is nothing to ship. If a product in the cart requires age verification (alcohol, for instance), an age confirmation checkbox appears automatically without affecting customers who are buying non-restricted items.
This is possible because the WooCommerce conditional checkout field editor with cart-based and field-value logic supports multiple condition types: conditions based on the value of another field, conditions based on what products are in the cart, and conditions based on the shipping method the customer selects. You configure these rules through a visual builder, not through code.
When a customer selects “Company” as their address type from a dropdown, a “VAT Number” field appears instantly. When they select “Personal,” it stays hidden. This keeps the initial form clean and reveals complexity only when it is relevant to the specific customer filling out the form.
If a customer adds a product that requires special handling, like a fragile item or a restricted product, your checkout form can respond automatically. An age verification checkbox that only appears when alcohol is in the cart. A “delivery access instructions” field that only appears when oversized furniture is being purchased. The checkout stays minimal for simple orders.
When a customer selects “Local Pickup,” there is no need for a shipping address. When they select “Local Delivery,” a “Gate Code” or “Drop-off Notes” field might be essential. Shipping method conditions let you match the checkout form to the actual logistics of each order without cluttering the experience for customers who chose standard shipping.
If your store sells a variety of product types, there is a high chance that the data you need at checkout varies depending on what the customer is buying. A store that sells both standard t-shirts and personalized engraved jewelry needs an engraving text field for the jewelry orders, but showing that field to a customer buying a plain t-shirt makes no sense.
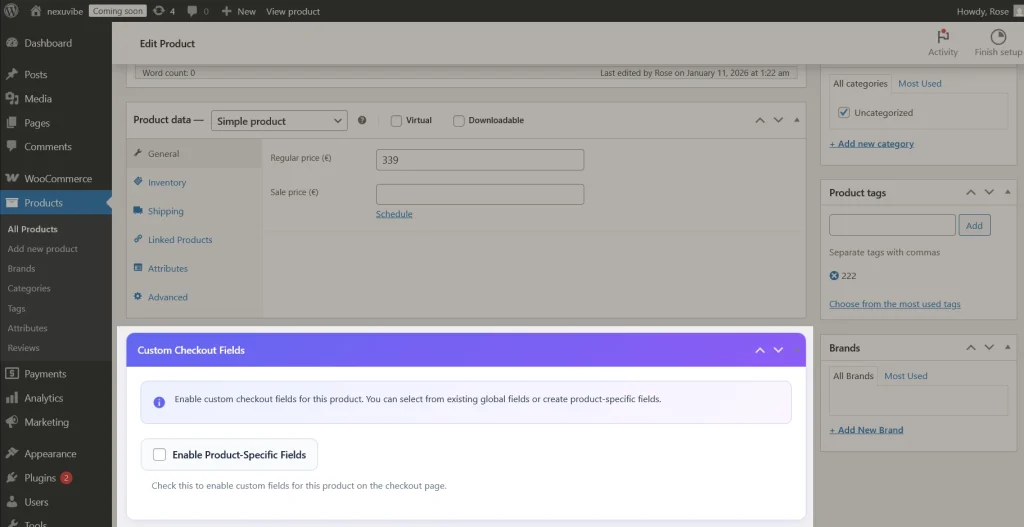
Per-product checkout fields solve this cleanly. You assign specific custom fields directly to individual products. When that product is in the cart, its fields appear at checkout. When it is not, they do not. This is managed directly from the product edit screen in WooCommerce, alongside pricing and inventory settings. No extra menus, no extra configuration pages.
This feature is especially valuable for stores that sell event tickets (collect attendee names and dietary preferences per ticket), personalized gifts (collect engraving text, custom messages, or color choices per product), B2B items (collect purchase order numbers or business references for specific wholesale products), and anything with regulatory requirements (age verification only for products that legally require it).
The key benefit is that your global checkout stays clean. Customers buying straightforward products see a short, fast form. Customers buying products that need extra information see exactly the fields that are relevant to their purchase. Nothing more, nothing less.
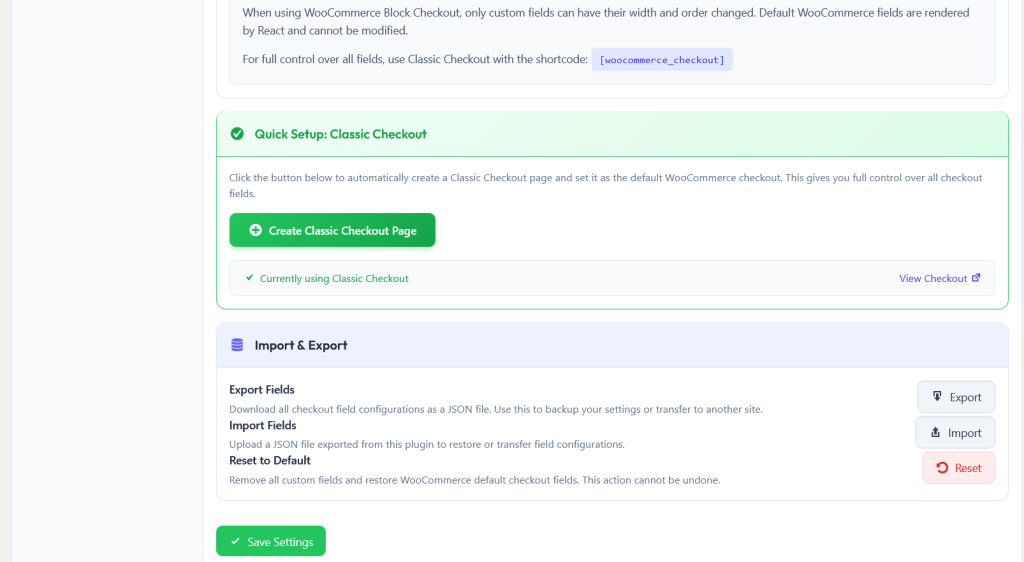
WooCommerce has been transitioning its checkout page from the classic shortcode-based system to the newer Blocks-based checkout. If your store uses the WooCommerce Blocks checkout (which is becoming the default for new installations), you need to make sure your checkout field editor works with it.
This is a compatibility question that trips up a lot of store owners. Many older checkout field editor plugins only work with the classic shortcode checkout page. The NEXU plugin supports both, so your field customizations work regardless of which checkout system your theme uses. If you switch from the classic checkout to the Blocks checkout in the future, your fields carry over without reconfiguration.
Once you have built a checkout field configuration that works well, protect it. Export your entire configuration to a JSON file. This serves two purposes: it is your backup in case anything goes wrong on the site, and it is your deployment tool if you manage multiple stores or need to set up the same checkout structure on a staging environment.
For agencies or freelancers managing client stores, this export/import feature is a significant time saver. Design the ideal checkout field structure once on a staging site, export it, and import it to the production site. When a client asks for a similar setup on their second store, import the same configuration and make minor adjustments. No rebuilding from scratch.
If you ever need a completely fresh start, the one-click reset feature restores all checkout fields to their original WooCommerce defaults. This is useful when you inherit a store that has been modified in ways you cannot untangle, or when a testing phase produces a configuration that does not work and you want to start over cleanly.
Different businesses need different checkout configurations. Here are some real-world examples of how different types of WooCommerce stores benefit from checkout field customization.
Checkout customization is not a cosmetic exercise. It is an operational decision that affects your conversion rate, your order data quality, and how much time you spend chasing missing information after the sale. The default WooCommerce checkout works well enough to get started, but as your store grows and your product catalog becomes more diverse, the gap between what the default form asks and what your business actually needs widens.
The approach in this guide, using a visual editor with drag-and-drop, conditional logic, and per-product field support, lets you close that gap without introducing the fragility of code snippets or the dependency on a developer every time you need to make a change. The result is a checkout page that asks the right questions to the right customers at the right time, collects clean data, and removes every unnecessary friction point between “Add to Cart” and “Place Order.”
Start with the audit. Remove what you do not need. Add what you do. Set up conditions so the form adapts. And export your configuration so you never have to rebuild it from scratch. That is the workflow, and it takes less time than you might expect.
Add, remove, rename, and rearrange checkout fields. Build smart forms with conditional logic. Assign unique fields to individual products. No coding required.






Got this for my brother's shop works fine, but the updates keep wiping my changes. kinda annoying
This guide was an absolute lifesaver when I was setting up our clinic's online store. we sell both physical first aid kits and digital training manuals, and the default WooCommerce checkout was a total disaster asking for shipping on ebooks, skipping tax IDs for bulk orders, you get the idea. the step by step instructions for conditional fields were perfect, especially the part about hiding shipping when the cart is digital only. my only minor frustration was tweaking the priority numbers for field order
Finally a guide that actually shows how to clean up checkout fields without breaking my site