
Starting an affiliate program for your WooCommerce store sounds straightforward until you actually try to set one up. You quickly realize there are more moving parts than you expected: how tracking works, what the affiliate sees, how commissions get calculated, and how you handle payouts without creating a support queue that never closes. Most guides skip over the operational side and focus on the exciting part. This one does not.
This guide walks through every stage of setting up a WooCommerce affiliate program in 2026, from deciding whether you are ready to launch one, all the way through the configuration steps that most store owners only discover by trial and error. The goal is a program that works predictably from the first week, not one you end up rebuilding three months later because the foundation was wrong.
Throughout this guide, we reference Affiliate Engine, a WooCommerce referral and commission tracking plugin built specifically for this kind of practical affiliate setup. The principles apply broadly, but the screenshots and configuration examples come from this tool.
Before you start: is your store actually ready?
An affiliate program amplifies what is already happening in your store. If your product pages convert well, your checkout is smooth, and customers leave with a good impression, affiliates can accelerate that growth significantly. If any of those pieces are broken, affiliates will send traffic that bounces, and you will spend more time explaining why commissions are not being generated than actually running the program.
Before installing any plugin, run through this quick check. It takes ten minutes and will save you weeks of frustration later.
If you are not consistently getting organic sales from people who found your store themselves, an affiliate program is unlikely to fix that. It can help you reach more people, but it cannot make a product convert that does not already convert. Run your affiliate program launch from a position of proven conversions, not in hope of discovering whether your store works.
Before you configure commission settings, you need to know what you can afford to pay. A typical WooCommerce affiliate commission runs between 5% and 30% depending on the product type and margins. Physical products with thin margins usually sit at the lower end. Digital products and services can afford more. You do not need to optimize this perfectly on day one, but you do need a number that will not hurt you if the program takes off.
Even a well-structured affiliate program needs regular attention. Approving requests, reviewing referral records, processing payouts, and handling occasional questions from affiliates will take time each week. If you are already stretched thin running the store, launching an affiliate program adds to that load. Thirty minutes a week is a realistic minimum for a small program. Plan for it before you launch.
Choosing the right WooCommerce affiliate plugin
There are several affiliate plugins available for WooCommerce. They range from very lightweight tools with minimal configuration to complex systems built for large enterprise programs. For most WooCommerce stores starting out in 2026, the right choice sits somewhere in the middle: enough features to run a real program, without so much complexity that setup becomes a project in itself.
Here is what to look for when evaluating any affiliate plugin for WooCommerce:
The affiliate dashboard should be inside the WooCommerce account area or at least accessible without admin credentials, so affiliates can check their results without bothering you. Commission rules should be configurable without writing code. The plugin should have its own payout management, not just track earnings and leave you to figure out payments manually. Fraud detection should be included, not an afterthought. And setup should not require a developer to get through the initial configuration.
Affiliate Engine for WooCommerce covers all of these criteria. It is built around a practical admin workflow: affiliates, referrals, payouts, visits, tiers, creatives, and fraud are all managed from a single dedicated dashboard. The affiliate experience lives inside the WooCommerce My Account area. Commission rules are configured through a settings panel, not code. And the setup wizard gets the essentials in place quickly, so you can launch on the same day you install.
For stores that want a direct comparison, other commonly used options include AffiliateWP and SliceWP. Both are legitimate tools. The main differences come down to pricing structure, the depth of fraud protection, and how the affiliate dashboard is presented to end users. For WooCommerce-native programs that prioritize a clean affiliate experience and strong admin controls, Affiliate Engine is the more purpose-built option.
Step 1: Install and run the setup wizard
After installing and activating the plugin, the first thing you should do is run through the setup wizard. The wizard is designed to get the foundational settings in place quickly: your program name, basic commission rules, registration mode, and how the affiliate area appears to users. It takes less than ten minutes and prevents the most common configuration mistakes that store owners make when they skip setup and go straight to the settings tabs.

During the wizard, you will set the registration mode. This is an important decision. Auto-approve is fine for very small programs where you personally know the affiliates you are inviting. For any publicly accessible program, manual approval is the better starting point. It lets you review each applicant before they get access to referral links, which keeps the affiliate list clean and reduces the chance of low-quality promotion from the start.
Once the wizard is complete, the core infrastructure is in place. From here, the configuration becomes more specific to how your store operates and what kind of affiliate program you want to run.
Step 2: Configure your commission settings
Commission settings are the most important part of the configuration and the one that most store owners rush through. The decisions you make here affect how much you pay, when commissions become payable, and whether the program stays financially sustainable as it grows. Take time with this section.

The key decisions in commission settings are these: the commission type (percentage or flat amount), what the commission is calculated on (order subtotal, subtotal minus tax, subtotal minus shipping, or full order total), which WooCommerce order status triggers commission approval, the hold period before commissions become payable, and whether you allow self-referrals.
Percentage commissions are simpler to manage and scale naturally with order value. Flat commissions work better when you want predictable payouts regardless of order size, or when your product catalog has a narrow price range. For most WooCommerce stores with varied product prices, percentage commissions are the more practical starting point.
Calculating commission on the subtotal excluding tax and shipping is generally the safest approach. Paying commission on tax means you are effectively sharing revenue that belongs to the government. Paying commission on shipping means affiliates earn more when buyers happen to live further away, which is rarely the intent. Subtotal minus tax and shipping is the most defensible and predictable base for most stores.
Setting a hold period that covers your refund window is important for stores with active return policies. If your refund window is 14 days, a 14 to 21 day hold period ensures that commissions only become payable once the order is genuinely final. The approval trigger (which WooCommerce order status approves the commission) should be “completed” rather than “processing” for the same reason.
Allowing affiliates to earn commission on their own purchases is a choice that sounds generous but creates real problems at scale. It incentivizes people to join your affiliate program specifically to get a discount on their own orders rather than to actually promote your store. Disable self-referrals unless you have a specific reason not to, and document that decision in your affiliate program terms.
Step 3: Set up the registration flow for new affiliates
The registration experience sets the tone for the affiliate relationship. When someone wants to promote your store, their first interaction with your program is the application form. That experience shapes their expectations and, frankly, helps you filter out low-effort applicants before they are ever inside your program.

The registration settings let you configure which fields appear on the application form, whether approval is automatic or manual, and where the registration form is embedded on your site. On the field side, asking for a website URL or social media profile is useful because it tells you immediately whether the applicant has a real audience. Someone with no website and no social presence is unlikely to send meaningful referral traffic.
The registration form can be placed on any WordPress page using a shortcode, or embedded with an Elementor widget if your site is built in Elementor. Create a dedicated affiliate program page, write a short description of your program terms, and then place the registration form below it. Affiliates who read your terms before applying are already better quality applicants than those who just want a link.
Step 4: Review and approve your first affiliates
Once the registration page is live and you have started inviting people to apply, the Requests tab in the admin dashboard is where you manage incoming applications. This is also the screen you will come back to on a weekly basis as the program grows, so it is worth familiarizing yourself with it early.

When reviewing applications, look at the information the applicant provided on the registration form, cross-reference any website or social media URLs they submitted, and make a judgment call based on whether they are likely to send genuine traffic. Approving affiliates quickly is a courtesy, but approving bad ones quickly just creates problems sooner.
When you approve an affiliate, they receive a notification email (configured in the Notifications settings) and gain access to their dashboard inside the WooCommerce My Account area. Their referral link is generated automatically at the point of approval. From that moment, they can start sharing.
Step 5: Understand what your affiliates see
The affiliate experience is something most store owners overlook during setup, and it is one of the most important parts of running a successful program. Affiliates who can easily find their link, check their earnings, and see which referrals have converted are affiliates who keep sharing. Affiliates who have to email you to figure out basic things stop sharing pretty quickly.
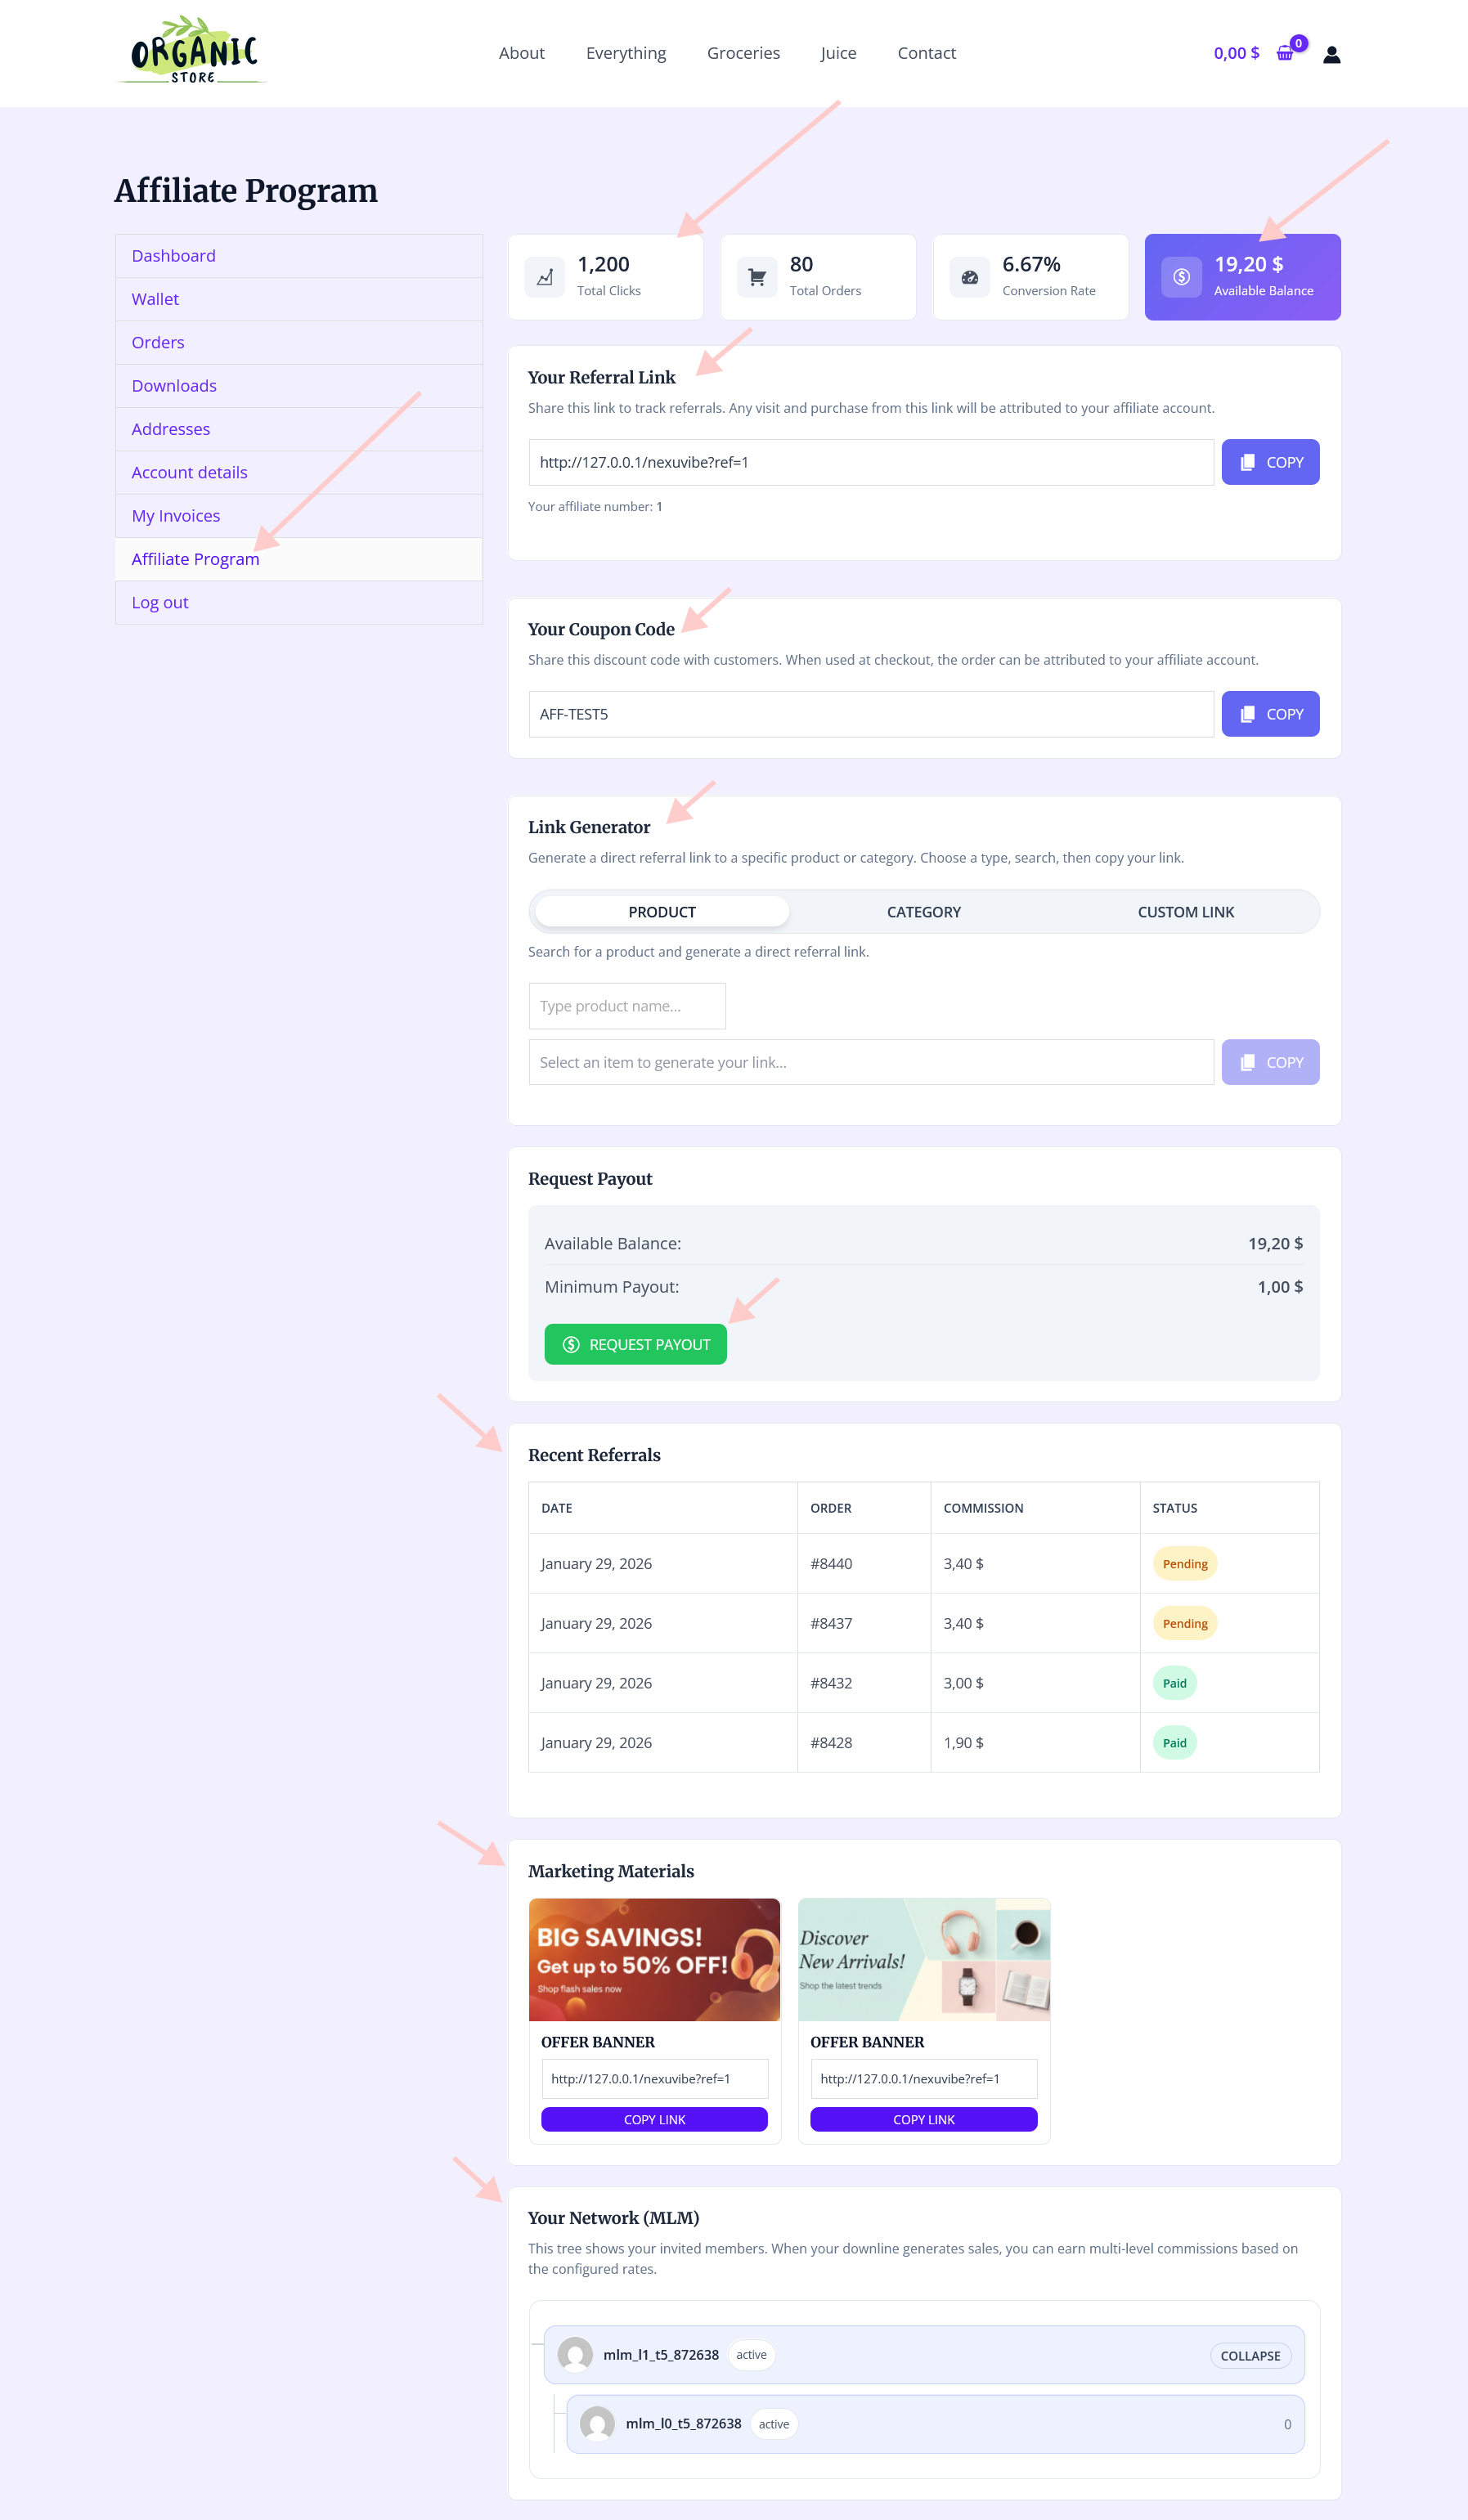
The frontend dashboard inside the WooCommerce My Account area gives affiliates access to their referral link, a link generator for creating custom tracking links to specific products or pages, their commission history, their payout request tools, and any creatives you have published for them to use. Everything they need to share and track their results is in one place, without requiring admin access to your WordPress site.
Before you start approving real affiliates, log in to a test account and go through the affiliate experience yourself. Check that the link generator works, that the commission summary displays correctly, and that the payout request process is clear. Fix anything that is confusing before real affiliates encounter it. The experience they have in the first week sets the tone for how active they remain.
Step 6: Set up coupon tracking
Referral link tracking covers most attribution scenarios, but coupon tracking is an important addition for stores that promote through channels where direct links are harder to share — social media bios, podcasts, email newsletters, and in-person recommendations. When coupon tracking is enabled, each affiliate can have a unique coupon code that attributes the sale to them even if no referral link was used.
When both a referral cookie and a coupon code are present at checkout, the priority setting in the commission configuration determines which one takes precedence. In most cases, the coupon code should take priority, because it represents a deliberate attribution signal. A referral cookie might be from weeks ago; a coupon code means the buyer actively used that affiliate’s promotion in this purchase. Set the priority in the commission settings, document the decision in your affiliate terms, and communicate it to affiliates when you onboard them.
In the commission settings, you can enable coupon attribution, configure the coupon code format (including prefix and style), and choose whether the coupon is visible to the affiliate in their dashboard. Making the coupon visible is almost always the right choice: affiliates who know their code will use it actively in their promotions, which increases the chance of attribution being captured correctly.
If an affiliate is approved but their coupon code has not been generated yet, the system can generate it on demand. This means you do not need to manually create WooCommerce coupons for each affiliate, which would become unmanageable quickly at any meaningful scale.
Step 7: Configure payout settings and workflow
Payout management is the part of running an affiliate program that most guides treat as a footnote, and then store owners discover it is actually the most sensitive part of the whole workflow. When affiliates feel confident about payouts, they stay engaged and keep promoting. When payouts feel unclear or unreliable, even active affiliates slow down.

The payout settings define the minimum amount an affiliate must have in approved commissions before they can request a withdrawal, and the rules around how those requests are processed. A minimum payout threshold is useful for reducing administrative overhead: processing dozens of small payouts is much less efficient than processing fewer, larger ones. A minimum of $30 to $50 is reasonable for most stores.

Set a regular payout schedule and communicate it to affiliates when you onboard them: for example, payouts are processed on the first Monday of each month. A predictable schedule means affiliates know when to expect payment and reduces the questions you get about payout status. When you process payouts, the payout requests screen shows pending requests clearly so you can review and mark them as paid without losing track of anything.
Step 8: Enable fraud detection from the start
Most affiliate programs do not have a fraud problem on day one. They develop one gradually, usually around the time the program becomes worth gaming. The mistake is waiting until fraud actually appears before setting up detection. By then, some bad data has already mixed in with good data, and cleaning it up is more work than preventing it would have been.

The fraud settings let you define detection rules that flag suspicious activity without blocking it outright. Flagged activity appears in the Fraud tab of the admin dashboard, where you can review it and decide how to respond. This is the right approach: automatic blocking can catch legitimate affiliates in edge cases, while review-based flagging keeps you in control of decisions while still surfacing patterns that need attention.

Step 9: Monitor performance with the admin dashboard
Once the program is running, the admin dashboard becomes your operational hub. The overview tab gives you a summary of recent activity, which affiliates are active, what is pending in terms of commissions and payouts, and any signals that need your attention. This is the screen you open at the start of each week to understand where the program stands.

The Affiliates tab shows you who is in the program and lets you manage individual accounts. The Referral tab shows attributed orders with commission records. The Visits tab shows traffic being sent through affiliate links. The Tiers tab manages performance levels if you choose to implement them. And the Creatives tab is where you publish promotional materials for affiliates to use in their campaigns.

Step 10: Reward top performers with tiers
Performance tiers are not something you need on day one, but they are worth planning for early. As your affiliate program grows, some affiliates will consistently outperform others. A tier system lets you reward that performance with higher commission rates in a structured, transparent way, rather than making ad hoc deals with individual affiliates that are difficult to manage consistently.

The tiers structure works alongside the base commission settings. When an affiliate reaches a defined performance threshold, their commission rate adjusts to reflect their tier level. This happens automatically based on the rules you define, which means you are not manually updating commission rates for individual affiliates as they grow. It scales with the program without adding to your admin workload.
What to check in the first four weeks after launch
Launching the program is not the end of setup. The first four weeks reveal configuration decisions that need adjustment, patterns in affiliate behavior that you did not anticipate, and small friction points in the affiliate experience that reduce engagement. Here is what to actively review in the early weeks.
Common mistakes to avoid when starting a WooCommerce affiliate program
After the setup steps, it is worth pausing on the mistakes that consistently trip up store owners who launch affiliate programs for the first time. These are not exotic edge cases. They are the predictable consequences of decisions that seem fine at the time but create operational problems a few weeks in.
Quality over quantity applies to affiliates too. A large affiliate list with mostly inactive or low-quality promoters creates noise in your dashboard, generates visits that do not convert, and makes it harder to notice which affiliates are actually performing. Approve selectively, especially at the start. Ten genuinely active affiliates are worth more than a hundred who post a link once and disappear.
If commission is approved when an order reaches processing status, and a customer then requests a refund, you have already approved a commission that should not have been paid. Set commission approval to “completed” and use a hold period that covers your refund window. This one configuration decision prevents a significant amount of commission reversal headache.
Affiliates who do not know when or how they will be paid will ask you. Every time. Set a clear payout schedule, communicate it in your affiliate onboarding email and your program terms page, and stick to it. Consistency builds trust, and trust keeps affiliates active. Inconsistency, even once, creates doubt that is hard to recover.
A small program feels too small to worry about fraud. Then it grows, and the fraud detection that was never configured means you have no visibility into suspicious patterns that have been accumulating for months. Configure the fraud settings when you set up the program, check the Fraud tab regularly, and you will rarely have to act on it. Skip it entirely, and the first time it becomes relevant, you will be dealing with it reactively under pressure.
When to add the optional add-ons
Affiliate Engine includes two optional add-ons for stores that need capabilities beyond the core program. These are worth understanding from the start, even if you do not need them yet, because they affect how you might want to structure your program as it grows.
This add-on creates a permanent database link between a customer and the affiliate who first referred them. Future purchases by that customer are attributed to the same affiliate, even when no referral cookie is present. This is valuable for stores with long purchase cycles or recurring customers, where the value of an affiliate’s contribution extends well beyond a single visit. Add this when you have affiliates who are consistently bringing in buyers who return multiple times.
This add-on adds sponsor tracking and multi-level commissions in a uni-level structure, plus a visual downline tree. It is specifically for stores where the affiliate program is designed to grow through network recruitment, not just direct referrals. This is a significant structural addition to the program model. Add it only when you have deliberately decided to build a network-style program, not as a default enhancement.
The honest summary: what makes a WooCommerce affiliate program actually work
After going through all of these setup steps, the most important insight is a simple one. An affiliate program works when it is consistent, not when it is complex. The stores that run successful affiliate programs are not the ones with the most sophisticated commission structures or the largest affiliate lists. They are the ones that review their dashboard every week, process payouts on a predictable schedule, respond to affiliate questions quickly, and make small adjustments to commission rules based on what the data shows.
The technical setup covered in this guide takes a day to complete. The operational habits that make it work take longer to build. Both matter, but the habits matter more once the program is live.
Affiliate Engine for WooCommerce gives you the infrastructure to run the program cleanly: organized dashboards, clear commission and payout controls, fraud visibility, and a frontend experience that keeps affiliates informed without requiring your involvement for every basic question. The program you build on top of that infrastructure is yours to shape. This guide gives you the starting point.
The WooCommerce affiliate plugin built for real store operations
Affiliate Engine gives you a structured affiliate dashboard, configurable commission rules, coupon tracking, fraud detection, payout management, and a frontend experience affiliates actually find useful.






Hey, love that this guide cuts to the
This guide actually does a decent job explaining how to set up an affiliate program, but it's real about the work involved. Approving requests, tracking referrals, and handling payouts take time it's not just a one and done thing.
Hey. the pre install checklist saved me hours
Finally a guide that doesn't sugarcoat the messy stuff saved me weeks of rework