Next-Level Code. Nexuvibe Style ...
Hrs
Min
Sec

WPML’s built-in automatic translation service works well enough. You buy credits, assign content for translation, and it gets translated. The problem is the cost. WPML charges per word through its credit system, and for sites with a lot of content or many target languages, those credits add up to hundreds or even thousands of dollars per year on top of the WPML license itself.
Meanwhile, OpenAI’s API pricing for GPT-4o sits at a fraction of what WPML charges per word. If you already have an OpenAI account for other purposes, or you are willing to create one, you can use that same API key to translate your WPML content directly. The catch is that WPML does not natively accept third-party API keys. You need an addon plugin that bridges the gap between WPML’s translation job system and OpenAI’s API.
This guide walks through the entire process: getting your API key, installing the right addon, configuring it, and running your first automated translation. We will use NEXU AI Auto Translator for WPML with OpenAI API key integration for this walkthrough because it supports not just OpenAI but also Claude, Mistral, and Grok, giving you options to try different models later without switching plugins.
Let us put real numbers on this. WPML’s automatic translation service uses a credit-based system. At the time of writing, WPML translation credits cost roughly $29 for 90,000 words, $79 for 270,000 words, or $159 for 720,000 words. These credits do not roll over indefinitely, and they get consumed faster than you might expect when translating into multiple languages.
Consider a mid-size WooCommerce store with 200 products, each averaging 300 words between the title, description, short description, and SEO metadata. That is 60,000 words of product content. Translate that into five languages and you are looking at 300,000 words of translation. At WPML’s credit pricing, that single batch of product translations costs around $79 to $100. Add blog posts, category descriptions, and page content, and you are easily spending $200 or more per year just on translation credits.
Now compare that to OpenAI API pricing. GPT-4o processes text at approximately $2.50 per million input tokens and $10 per million output tokens. For translation, input and output are roughly equal in length. A 300-word product description is about 400 tokens. Translating 300,000 words (approximately 400,000 tokens) through GPT-4o costs roughly $5 in total. That same batch that costs $79 to $100 through WPML credits costs about $5 through the API directly.
The math is not complicated. WPML’s credit system bundles translation service fees, markup, and platform costs into a single price. When you use your own API key, you pay OpenAI’s raw API rate with no markup from anyone. The addon plugin has a one-time annual cost but does not take a cut of your API usage.
If you do not already have an OpenAI account, go to platform.openai.com and create one. You need the platform account, not the ChatGPT consumer account. They use the same login but the platform account gives you access to the API dashboard where you can generate keys and manage billing.
Once you are in the platform dashboard, navigate to API Keys in the left sidebar. Click “Create new secret key,” give it a name like “WPML Translation” so you remember what it is for, and copy the key immediately. OpenAI only shows you the full key once. If you lose it, you will need to generate a new one.
Before you start translating, set a usage limit. Go to Settings, then Billing, then Usage limits. Set a monthly hard limit that matches your budget. For most WordPress sites, $10 to $20 per month covers substantial translation volume. This prevents any surprise charges if something goes wrong or if you accidentally queue more content than intended.
Sign up or log in. Add a payment method under Billing. OpenAI requires a credit card on file to use the API, but you only pay for what you use. New accounts often receive a small amount of free credits to get started.
Go to API Keys in the sidebar, click “Create new secret key,” name it something recognizable like “WPML Translation,” and copy it immediately. Store it somewhere safe. You will paste it into the plugin settings in a later step.
Under Settings, then Billing, then Limits, set a hard cap. Start with $10 to $20 per month. You can always increase it later. This ensures you stay in control of your spending while you get comfortable with the workflow.
You need a plugin that sits between WPML and OpenAI’s API. WPML does not natively accept external API keys for translation. The addon plugin registers itself as a translator within WPML’s translation management system, picks up translation jobs you assign to it, sends the content to OpenAI through the API, and delivers the completed translation back to WPML.
Download NEXU AI WPML automatic translation plugin with your own API key from the NEXU WP website. Install it through your WordPress dashboard under Plugins, then Add New, then Upload Plugin. Activate it and navigate to the plugin’s settings page.
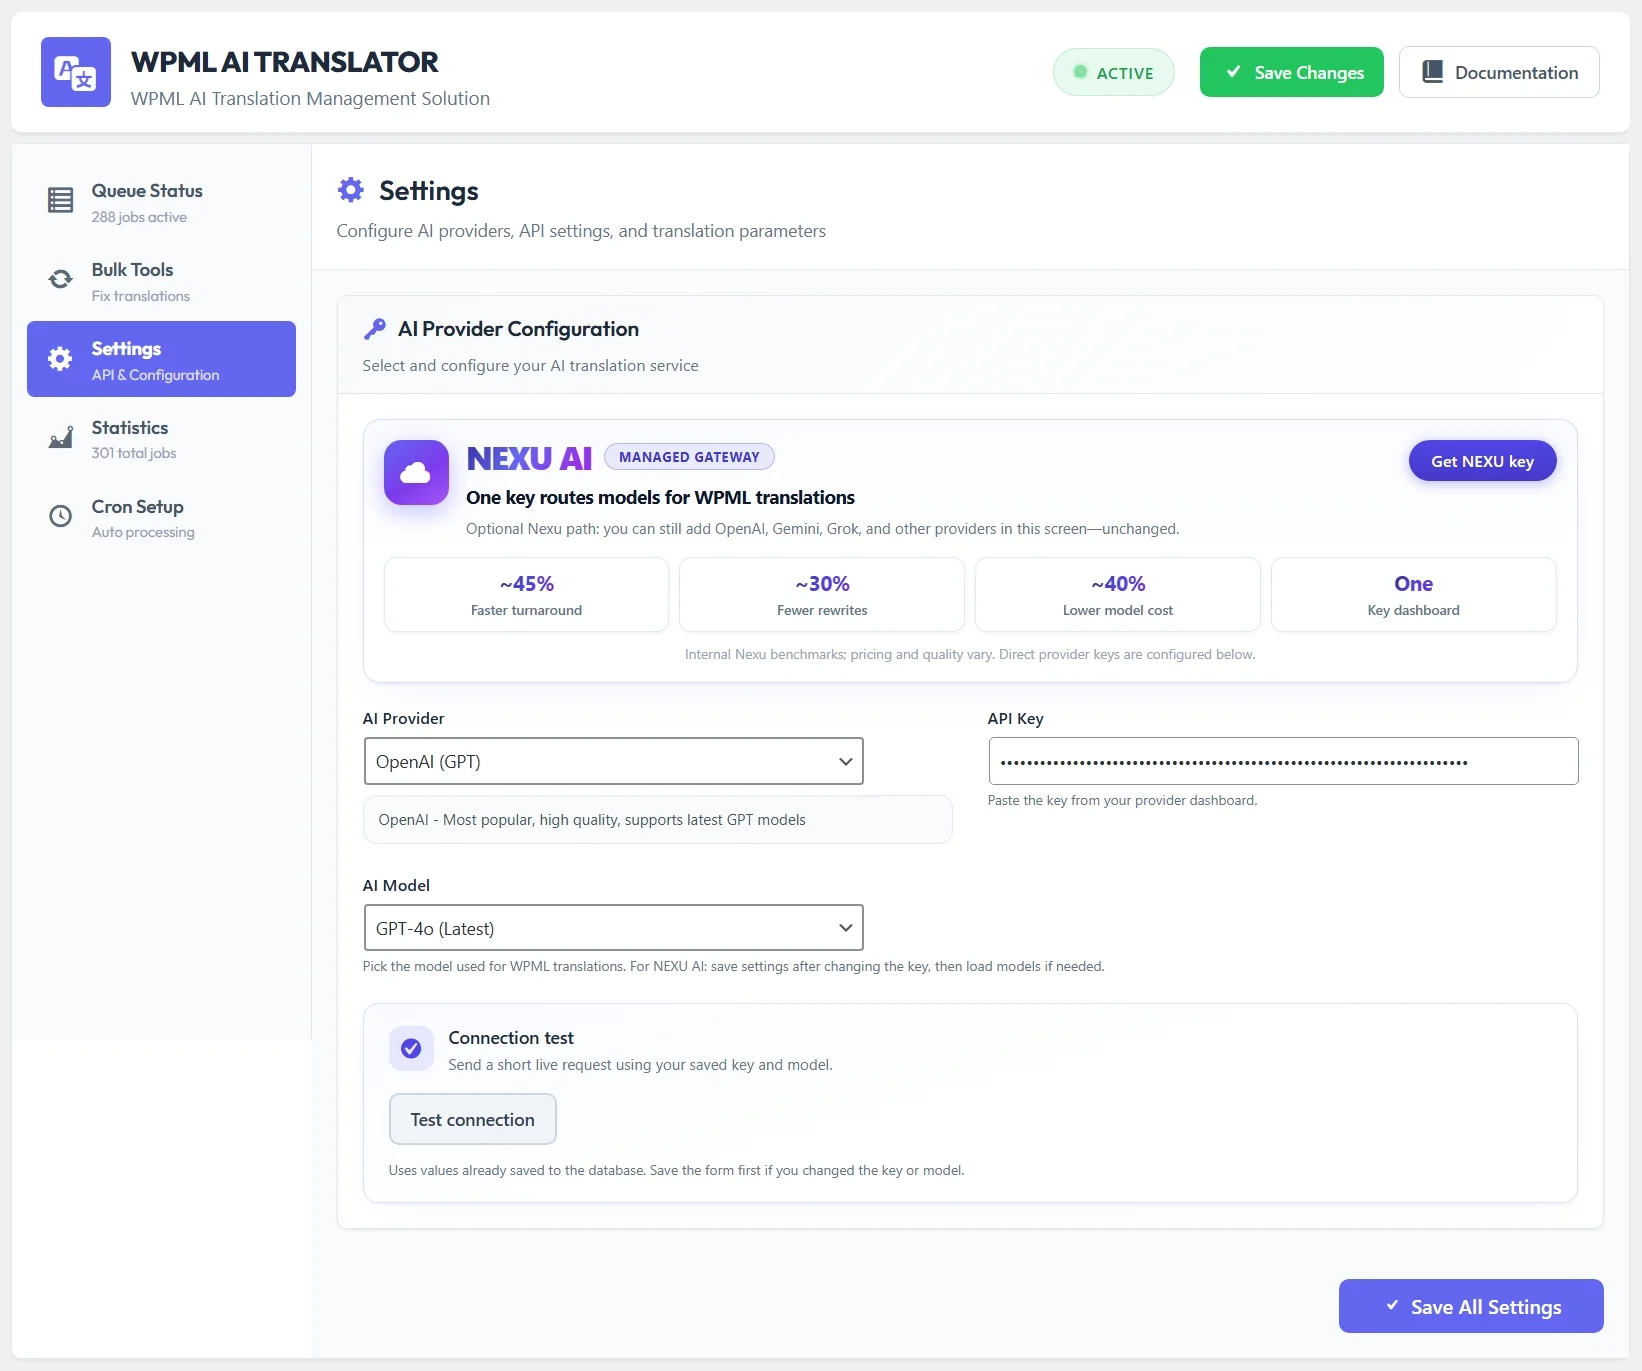
The configuration is straightforward. On the settings page, select OpenAI as your AI provider. Paste your API key into the key field. Choose your preferred model. For most translation work, GPT-4o gives the best balance of quality and cost. GPT-4.1 is also available if you want the latest model, though it costs slightly more per token.
The settings page also lets you configure chunk size for long content. The default works well for most sites, but if you publish very long articles (over 5,000 words), you may want to reduce the chunk size to avoid API timeouts. The plugin splits long content into chunks at natural paragraph boundaries, translates each chunk, and reassembles the complete translation automatically.
Save your settings and the plugin will test the API connection automatically. If the key is valid and the API is reachable, you will see a confirmation. If there is an issue, the plugin tells you what went wrong so you can fix it before creating translation jobs.
After activating and configuring the plugin, you need to tell WPML that a new translator is available. This happens mostly automatically, but there is one manual step.
Go to WPML, then Translation Management, then Translators. You should see the AI Translator listed as an available translator alongside any human translators you have configured. If it does not appear, deactivate and reactivate the addon plugin. WPML registers translators during plugin activation, so a quick toggle usually resolves this.
Once the AI Translator is visible in the translator list, you can assign translation jobs to it just like you would assign jobs to a human translator. The difference is that instead of a person receiving the job and working on it manually, the plugin picks it up automatically and processes it through OpenAI’s API in the background.
Now comes the part where everything connects. Go to WPML, then Translation Management. Select the content you want to translate. This could be a single post, a page, a WooCommerce product, or multiple items at once. Choose your target languages and assign the AI Translator as the translator for each language pair.
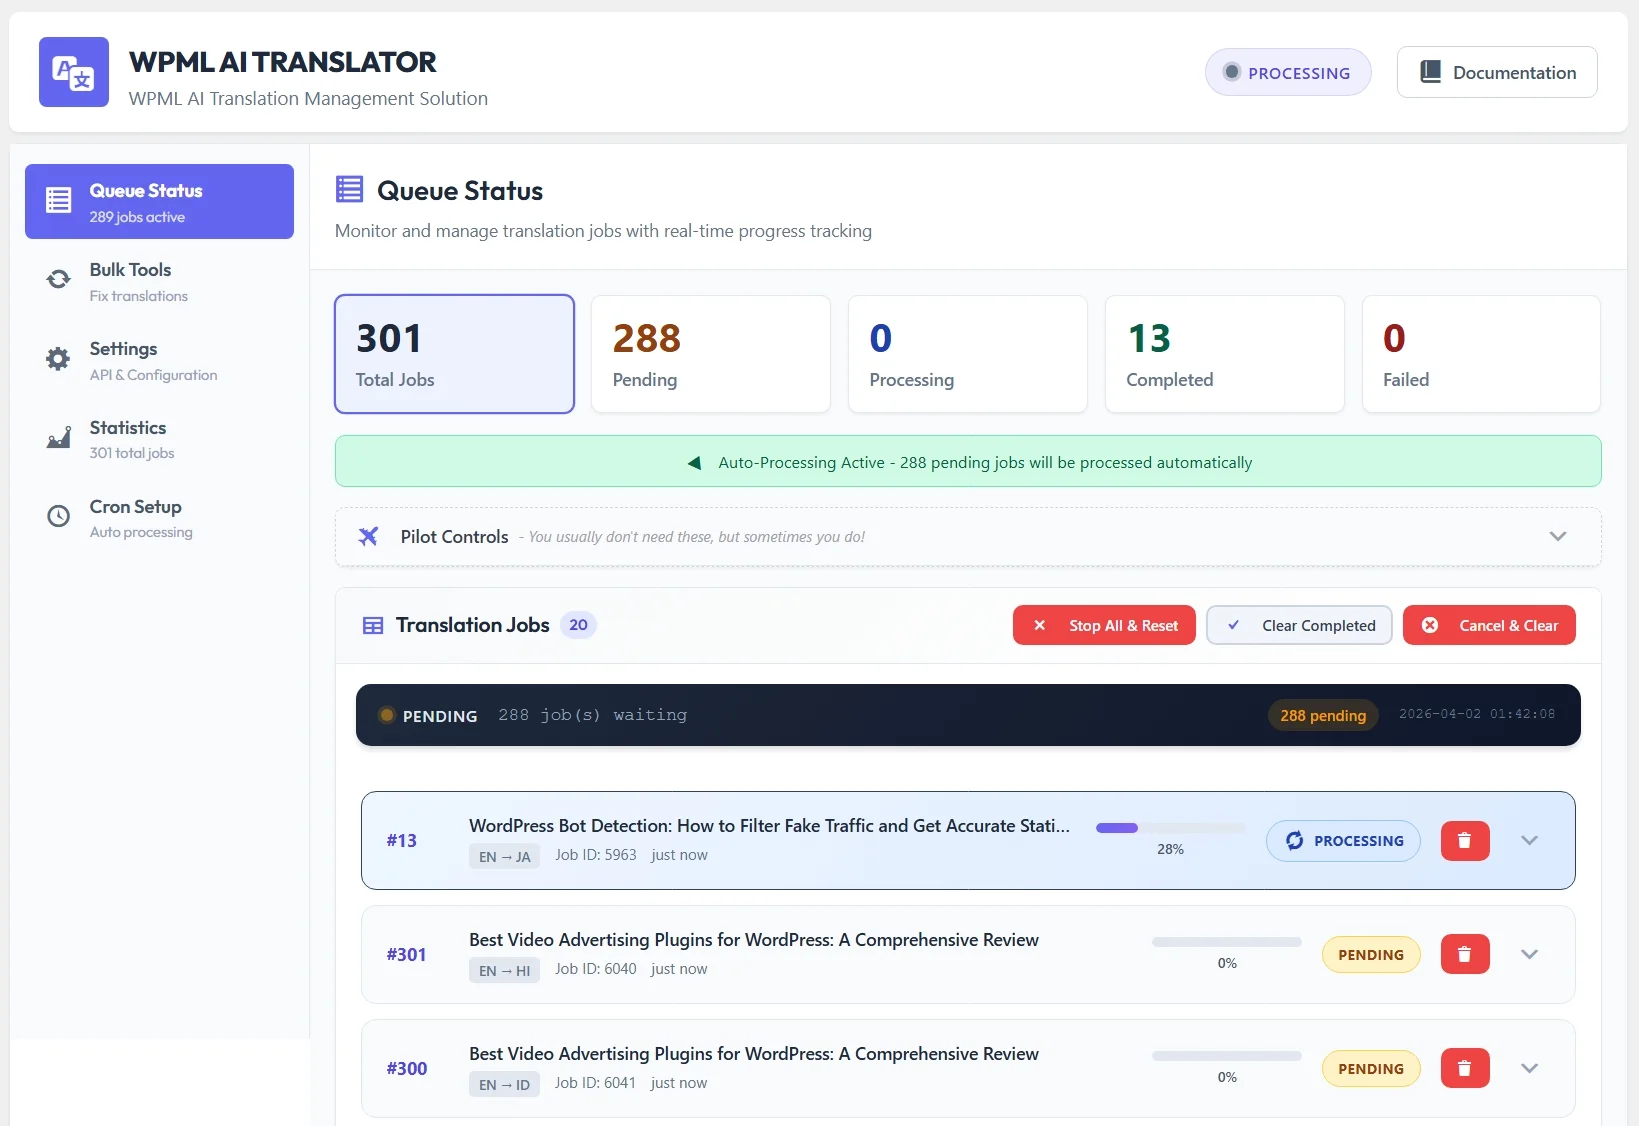
Click “Send all translation jobs” and the addon takes over from here. It detects the new jobs in WPML’s queue, sends the content to OpenAI through the API, receives the translation, and marks the WPML job as complete. The entire process runs through WordPress cron in the background. You do not need to keep your browser open or wait on any loading screen.
For a standard blog post of about 1,000 words, the translation typically completes within 30 to 60 seconds per language. A longer article of 3,000 to 5,000 words may take two to three minutes per language because the plugin splits it into chunks and processes each one sequentially. You can monitor the progress in real time on the plugin’s queue status page.
Once the translation job completes, the translated content appears in WPML exactly as if a human translator had delivered it. You can review it through WPML’s translation editor, edit any phrasing you want to adjust, and publish it when you are satisfied.
For the first few translations, we recommend reviewing the output to calibrate your expectations. AI translation quality in 2026 is very good for most content types, especially blog posts, product descriptions, and standard business copy. Technical documentation, creative writing, and content heavy with idioms may benefit from a quick human review after the AI does the heavy lifting.
The important thing to understand is that the plugin preserves your HTML structure, internal links, image references, and formatting. You are not going to receive a wall of plain text that you need to reformat. The translated content drops into WPML’s translation structure ready to publish, with all the layout and formatting of the original intact.
To make the savings concrete, here is a real scenario. A WooCommerce store has 200 products with an average of 350 words each (title, description, short description, SEO meta). The store publishes in English and translates to Spanish, French, German, Arabic, and Portuguese. That is five target languages.
The initial cost difference is significant but not dramatic. Where the savings become really substantial is in ongoing use. Every time you add new products, update existing content, or expand to additional languages, the API key approach costs pennies while the credit approach costs dollars. Over 12 months of regular content updates, the difference compounds.
There is also a psychological benefit that is worth mentioning. With WPML credits, every translation feels like spending money. You start to ration your translations, putting off updates to existing content because it costs credits. With your own API key, the marginal cost is so low that you translate freely. Update a product description? Retranslate it. Add a paragraph to a blog post? The translations update in minutes for fractions of a cent. This changes how you manage your multilingual content in practice.
We focused on OpenAI in this guide because it is the most widely used and the easiest starting point. But one of the reasons we recommend NEXU WPML AI translation addon supporting OpenAI Claude Mistral and Grok is that it does not lock you into a single provider.
Different AI models have different strengths in translation. In our experience, Claude from Anthropic produces more natural-sounding translations for European languages. Mistral excels at French and Arabic. Grok is fast and handles casual content well. OpenAI is the most consistent all-rounder. Having the ability to switch between these models from the same plugin settings page means you can always use the best tool for the job.
This also protects you against service disruptions. If OpenAI’s API goes down or has a slow period, you can switch to Claude or Mistral and keep your translations running. If one provider changes their pricing in a way that no longer works for your budget, you move to another without changing plugins or reconfiguring your WPML setup.
Most setups go smoothly, but here are the issues we have seen and how to resolve them.
Make sure you are using a key from platform.openai.com, not from the ChatGPT interface. The key should start with “sk-“. Also verify that you have a payment method on file in your OpenAI account and that your account is not in a suspended state.
This usually means WordPress cron is not running properly. Many managed hosts disable the default WordPress cron or throttle it. Check with your host to ensure WP-Cron is active. The plugin includes built-in health diagnostics that can identify cron issues. As a workaround, you can set up a real server cron job to trigger wp-cron.php at regular intervals.
Deactivate and reactivate the addon plugin. WPML registers translators during plugin activation. If that does not work, make sure your WPML version is up to date and that the Translation Management module is active in your WPML configuration.
If you see timeout errors for very long articles, reduce the chunk size in the plugin settings. Smaller chunks mean each API request processes less content, reducing the chance of timeouts. The plugin’s resume system ensures that even if a chunk fails, previous progress is saved and the job continues from where it stopped.
Using your own OpenAI API key with WPML is not a hack or a workaround. It is a legitimate, practical approach to multilingual content management that gives you better control over costs, the flexibility to choose between AI providers, and the freedom to translate as much content as you need without watching a credit balance drain.
The setup takes less than ten minutes. The cost savings start immediately. And with a plugin like NEXU AI Auto Translator for WPML with OpenAI and multi-provider support, the entire process from content creation to published translation runs automatically in the background while you focus on building your business.
If you are currently spending $50 or more per month on WPML translation credits, switching to your own API key pays for the addon plugin in the first week. If you are avoiding translating content because of the cost, this removes the barrier entirely. Your content deserves to reach every audience in their language, and it does not have to cost a fortune to make that happen.
Connect OpenAI, Claude, Mistral, or Grok to WPML. Automatic background translation. Intelligent chunking. Full HTML preservation. Starting at $39/year.








Just cracked how to work around WPML's credit pricing turns out their addon plugin lets you use your own API key instead. really helpful for my WooCommerce shop with 200+ products. was staring down $200+ a year for translations, but now I'm looking at closer to $40. yeah, there's a little extra setup, but their instructions make it pretty painless. If you're translating a ton of content, totally worth the effort.
Ran the numbers for my WooCommerce shop 200 products, each with around 300 words. translating to just one language through WPML's credit system would've cost me roughly $120. same exact job using OpenAI's latest model? About $5 at current pricing. That's not just a little cheaper, it's a completely different ballgame when you're dealing with bulk translations
This guide was a lifesaver for my mid size WooCommerce store I've got around 200 products, and each one has roughly 300 words between the title, description, and SEO metadata. translation costs were adding up fast. with WPML's credit system, I was shelling out over $200 a year just for Spanish and French translations